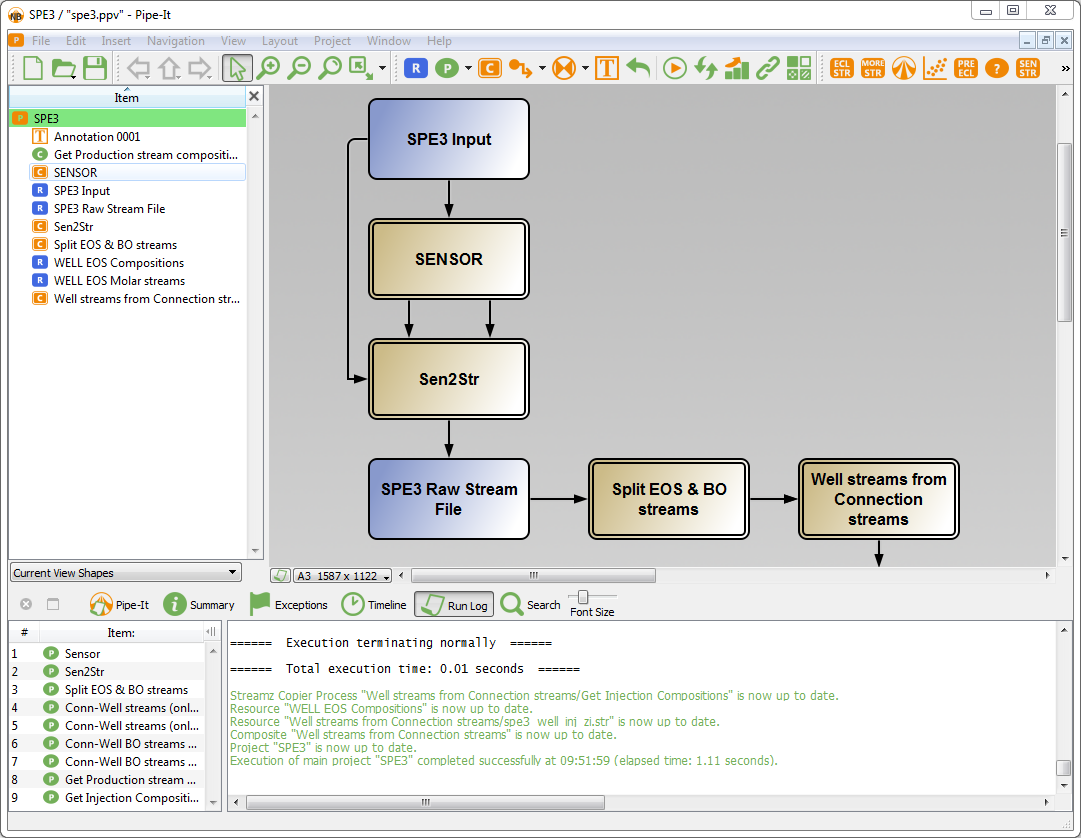
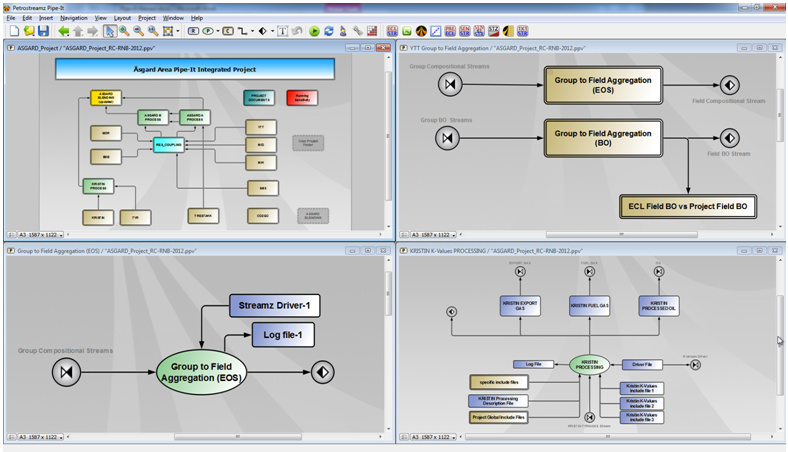
The Pipe-It graphical user interface offers easy access to functions for creating, maintaining and executing Pipe-It projects. Diagrams, describing resources, processes and their dependencies can be created by manipulating graphical elements in the canvas window. Resources (files/data) can be connected to processes (applications) via input and output sockets. Processes and resources can be grouped and labeled as composites, that can be executed by Pipe-It.
Data, or fragments of data in resources can be tagged and linked using Linkz. This enables Pipe-It to select specific data elements from project files and feed these to one of the available optimizer plugins. Or transfer them from one file to another using MapLinkz.
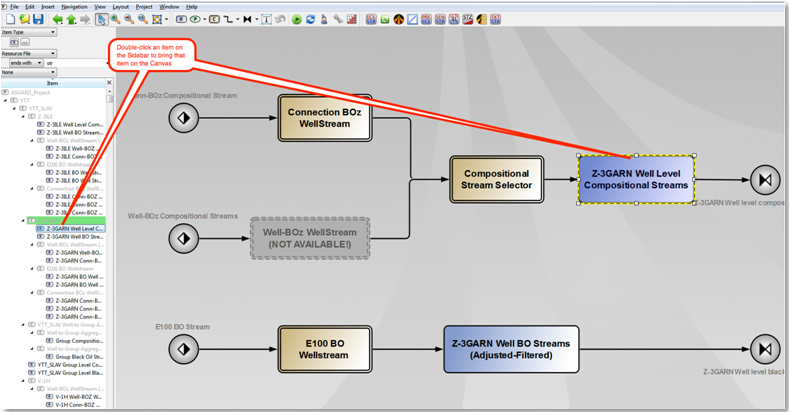
Pipe-It projects are hierarchical in nature and can be viewed as a tree structure in the Pipe-It explorer window (left). Clicking on an item in the explorer will highlight the corresponding graphical element in the canvas.
After creating project structure and links to data, a project can then be executed and optimized. The built-in runner schedules processes execution and determines from the dependencies and the state of the resources when a given process is allowed to start. Project execution involves running applications that are external to Pipe-It as well as internal Pipe-It components. Textual output from the runner and these applications is shown in the console output window (bottom).
Pipe-It's graphical interface offers a typical menu expected of such programs. The names of the menus are a combination of:
Related to Project open, close, save, recent projects, import/export and quitting the application.
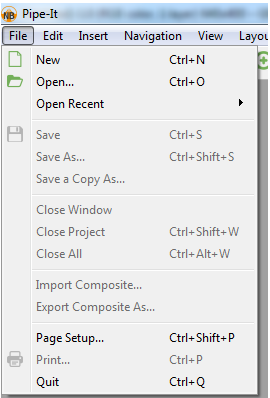
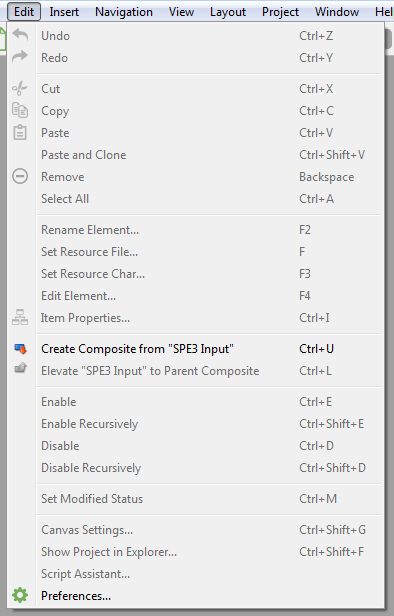
Most of these options are available with the context menu and will be discussed there. Few options are only available as items to this menu:
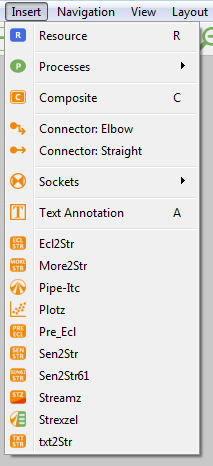
All items on this particular menu are also available on the Toolbar. Users will tend to use the icons on the Toolbar or keyboard short-cuts (shown on the screenshot below) to insert those elements on the canvas.
Application Tool Bar consists of 3 main sections:

Now describe all available actions in the tool bar:
This section has 3 main standard file actions as:
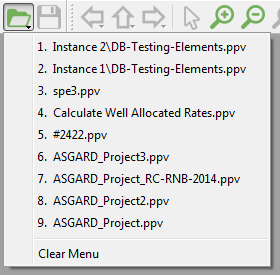
Note that Open Icon has small arrow in right bottom corner. If the Open icon is pressed and held for one second then drop-down menu appeared with list of recently opened projects.

First 3 buttons allow navigation through currently opened composites. Back and Forward work in same way as navigation buttons in a web browser. Up button changes view to upper-level parent composite. All these buttons can be pressed and held for one second to get list of history entries or, in case of Up button, for list of all parents of current composite.
Next 3 buttons Select, Zoom In and Zoom Out manage the current mouse cursor mode.
When Zoom In or Zoom Out is selected, then holding Alt (on Mac: Option) button temporally switch to opposite zoom action.
Also in Zoom In or Zoom Out, area selection on canvas switches view to Zoom-To-Fit the selection area into view:
Next to it is the, 1:1 button. It is not mode button, it just switches current view to un-zoomed (1:1) scale or in other words to 100% scale.
Finally, the last button in the tool bar is Zoom-To-Fit. Pressing the button zooms the canvas to fit all elements in the current view. There is also a drop-down menu to apply Zoom-To-Fit to:

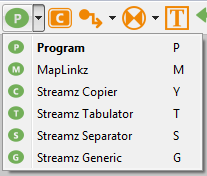
The toolbar contains 6 buttons which to add elements to the Canvas. The behavior of these buttons can be summarized as click-and-click. This means the button should be clicked once on the tool bar and then the location on the Canvas should be clicked where that element should be placed.
You may also double click on buttons on the tool bar. This will "turn on" the tool until you choose another one. This will prove practical if you want to add more than one element of the same type to the canvas. For example, if you have lot of connectors to make, just double click and make all your connectors as you want them to be, without having to turn on the connector tool on for each one.
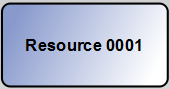
![]() This button means adding a Resource to canvas. The resource object represents a file on disk. Though you can give several names to the resource without a connection to actual used file name of the associated file on disk.
This button means adding a Resource to canvas. The resource object represents a file on disk. Though you can give several names to the resource without a connection to actual used file name of the associated file on disk.
On canvas the object looks in such way:
First double-click on the object opens Select File Dialog to associate a file with the object. A double-click on the object, that already has association, runs OS defined default Application associated with the file. For example, clicking on a resource with associated "text.txt" file, will open Notepad.exe
Also you can just drag-and-drop from Window Explorer to Canvas a file object. It will create a Resource automatically, associate the file to resource object and rename the resource to File Name of dropped file.
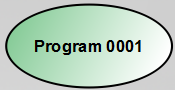
![]() This button means adding a Program (Script) to canvas. The scripter object represents an application to execute.
This button means adding a Program (Script) to canvas. The scripter object represents an application to execute.
On canvas the object looks in such way:
Double-click on the object opens Edit Script Dialog.
Sub-menu associated with the button allows to change default action to insert other elements that are bound to Program category.
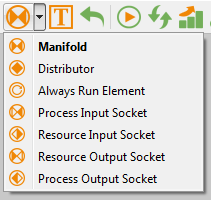
![]() This button means adding a Manifold to canvas. Manifold – gather information from multiple resources into one visual connector.
This button means adding a Manifold to canvas. Manifold – gather information from multiple resources into one visual connector.
Sub-menu associated with the button allows adding other type of similar elements - Distributors, Input/Output, Reseource/Process Sockets.
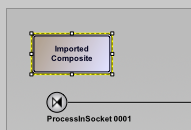
![]() This button means adding a Composite (Sub-Project) to canvas.
This button means adding a Composite (Sub-Project) to canvas.
On canvas the object looks in such way:
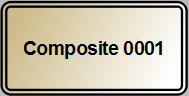
Look at Composites and Socket types for more details.
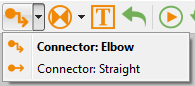
The next button allows placement of new connectors between resources and processes.
![]() This button means adding a object with text or image that does not play role in logic but can represent some illustration, information or instructions for the project.
This button means adding a object with text or image that does not play role in logic but can represent some illustration, information or instructions for the project.
![]() provides fast way to revert your changes one step at a time.
provides fast way to revert your changes one step at a time.
The section has 3 buttons that allows you to control running of current composite or the entire project.
The Canvas is Pipe-It's playing field. It is the empty area with a greyish background image (with Petrostreamz signature logo) where the user places their Processes and Resources. And Composites when the project starts getting a bit unwieldy.
Each Composite has its own Canvas.
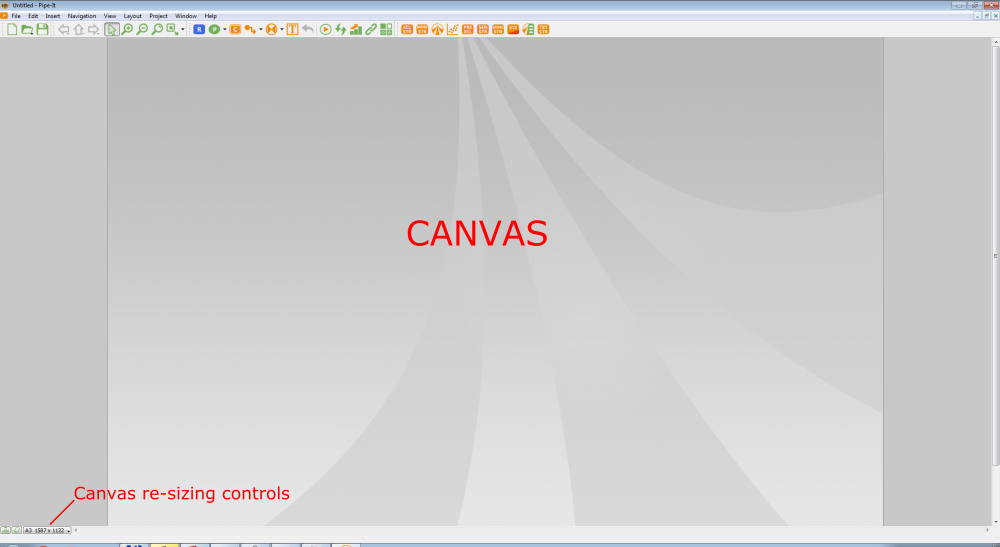
By default the Canvas is sized to A3 paper in portrait mode. Other sizes are possible using the short cut on the bottom left corner.
The Canvas will auto-size when the user moves a graphical element to the edge.
The default background image for each Canvas can be replaced by the user and positioned in multiple ways.
The Console window is an area of the Pipe-It GUI that contains information about the project and about the last run that was made. It has a tabbed interface containing the following aspects:
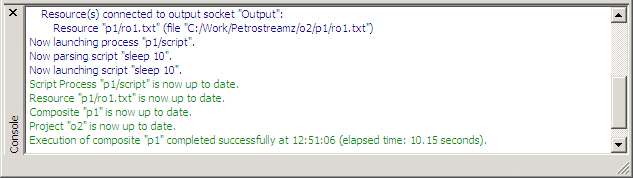
 Run Log: This tab is most important and will contain a log of what happened during the last execution of the project (or Composite). Colored text is used for output from Pipe-It's Runner while the output from a launched program is in plain (black) text. This output is useful when debugging an integrated project and cause of project halt or failure. All standard output from all executed programs is collected in this run log. It is advised to save this run log after an important project run as a record by right-clicking on the Run Log. A convenient name containing the time-stamp is suggested by default. Pipe-It can be asked to Auto-save this run log automatically by an option on the Project menu. The order of the output is based on a queuing system and reflects the order in which programs were started rather than when they finished.
 Timeline: The timeline is very useful when the user is interested in efficiency of execution of integrated project. It provides a graphical overview of the executed programs. The order is consistent with the Run Log. The user gets an overview which parts of the project are taking time and which parts are running in parallel.
 Exceptions: Pipe-It will collect exceptions (warnings, errors etc.) for applications supplied with Pipe-It (Streamz, Convertors) in this tab. Script Assistant supports this exceptions tab for extending this functionality to 3rd party applications being integrated. By specifying keywords in the program's output that qualify as exceptions, such output will be caught by Pipe-It and added to this collection. This is a powerful feature that allows Pipe-It to have a tighter runtime integration with 3rd party applications.
 Summary: The summary will give an idea about the size of the project by listing the number of graphical elements contained in the project. It also lists a Run Summary, which is a summary of the last run. The number of Resources, Processes and Composites that ran OK and the number Broken is given.
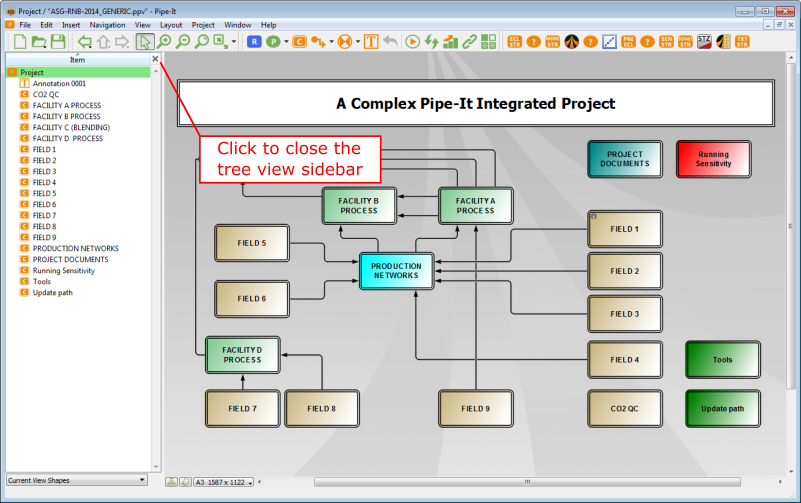
The Sidebar is also called the Tree View and is another way to look at the project. By default it gives the "Current View Shapes" pre-set (see below).
Pipe-It has a powerful feature to set up virtual collections of graphical elements that may span multiple composites in a project. Once invoked, such collections can be used with item properties dialog to similar settings to all elements in the collection using Apply to All (wherever available).
First possibility is to use the three view icon hidden in the bottom left corner of the Pipe-It interface.
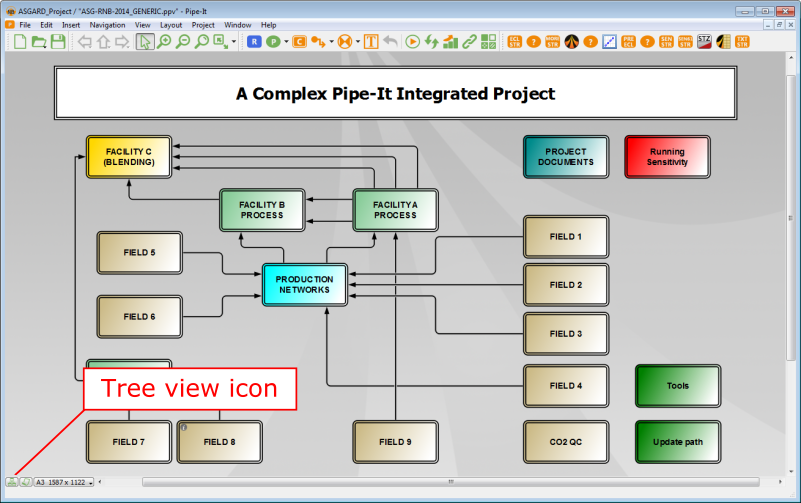
Clicking brings up the panel on the left. To hide it again click the cross as shown.
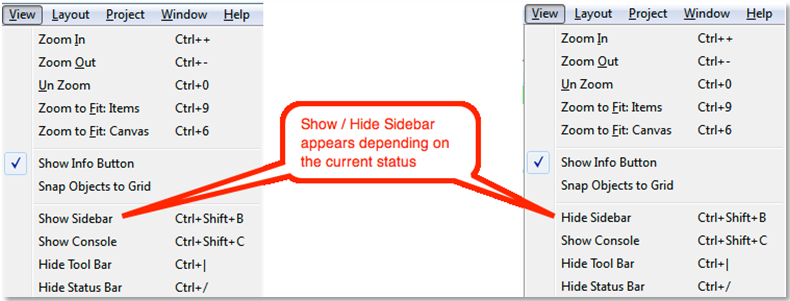
Another way to show and hide the Sidebar is to use the View Menu:
Once the Sidebar is open, it shows the pre-set called "Current View Shapes". This means all the graphical items on the current viewed Canvas (excluding connectors) will be part of the collection. Other pre-defined pre-sets are shown below. Note that presets with items instead of Shapes will include Connectors in addition. These are usually not so interesting.

The most interesting item on the list is "Add new Preset". This will essentially allow you to perform the task of Filtering that was available in earlier version, but at the same time, is more flexible.
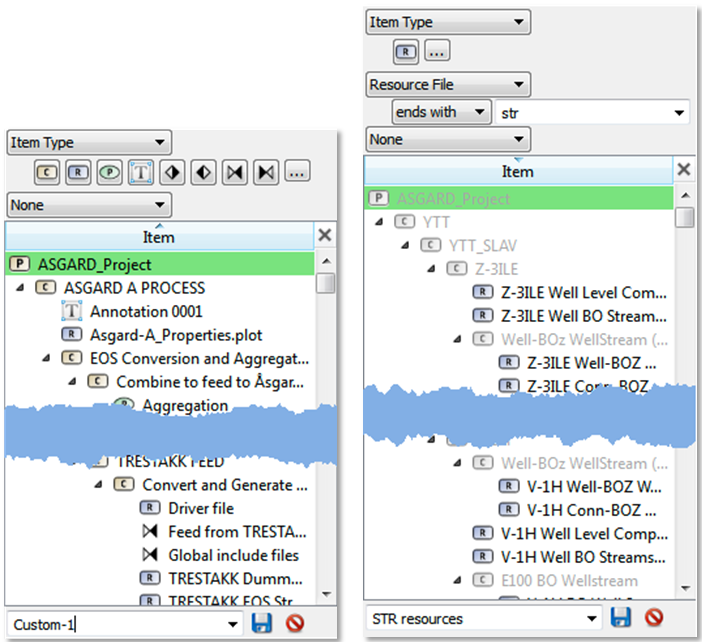
In the above sequence, I started with "Add a new Preset". This gives me the view on the left. I then:
remove the "Items" I do not need (everything except the Resources)
click on the send drop-down (called None) to select Resource File and
in the filter Criteria drop-down, I select "ends with".
In the empty field, I write "str".
The Display will update to that shown on the right side, and I can give it a name (e.g. STR resources) and save the preset. Effectively what I have done is to create a collection in the Sidebar that shows all the Resources in the entire project that have connections to a file that ends with the str extension. When I click the items on the collection, Pipe-It navigates to the canvas containing the item and selects it.
Once created, the user-defined Presets are also available, together with the default ones, in the Item Properties. This is a powerful means to collect, for example:
Resources with a particular characterization set and apply another characterization to all in the collection.
Annotations in all projects and apply Fill & Line color to all in the collection.
Pipe-It is used to visually connect the different components of a petroleum asset together. Pipe-It controls the flow of petroleum components from the reservoir to the point of sales. The logical model connection between all the components in the petroleum asset is stored as Pipe-It .ppm (model) files. Each user may have independent visual representations of the model stored as .ppv (view) files. Each project consists of one ppmodel file and one/multiple ppview files as well as the project related data files.
Pipe-It Application implements Multiple Document Interface (MDI), whose windows reside under a single parent window
Pipe-It is written in C++ using the Qt toolkit from Trolltech. Hence the product is developed in a cross platform environment and made commercially available for the following operating system platforms:
Insert Menu items and corresponding toolbar icons are typically used to insert new elements like resources, processes and connectors. To add multiple instances double-clicking the icon allows repeated additions on the canvas. Every subsequent click adds an instance of the element currently chosen. To come out of this mode use the ESC key.
Connectors are invoked in similar fashion from the Insert menu item or toolbar Icon, but one needs to move the mouse to the source element first (resource or process) when the element comes alive and shows its socket dock positions. The nearest dock becomes enlarged and the user chooses it by clicking (and releasing) the mouse button. The start of the connector is set and then the user moves to the destination element and repeats the procedure to set the end of the connector.
NOTE that connections between resource-resource and process-process pairs are prohibited and the GUI will not allow it (the wrong element does not expose its socket dock positions).
Selecting a single element is simple - just click on it. Selecting multiple elements can be done by shift-clicking and/or ctrl-clicking on the additional items. Also a rubber-band selection can be obtained by enclosing the required element by means of the mouse within a rectangle. The selected element(s) become visually highlighted.
Moving an element is by moving the currently selected element while keeping the mouse button pressed. If multiple elements are selected they will all move. If two elements are connected and one of them is moved, the appropriate end of the connector moves too.
Resizing of individual elements are done by dragging the "handles" in appropriate direction. More advanced alignment, resizing and Z-order of multiple elements are controlled by the Layout menu item.
Layout menu
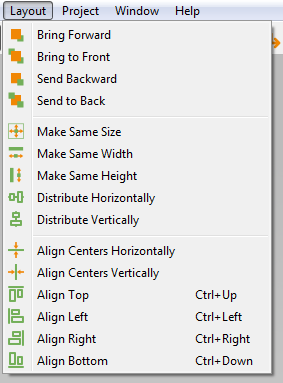
All these options are about appearance of your project. One can align the elements chosen in many different ways, including the most used, horizontally or vertically.
Under the resize option one can make two or more elements the same size, same width and height. One may also distribute them horizontally or vertically for a clean look. (This option sets the distance between elements the same).
The Z-order option is only useful if you have overlapping elements. Then you can bring an element to the front or to the back of the canvas. If you have more than two elements on top of each other, the two last options under Z-order is useful, to alter the order of the overlapping elements.
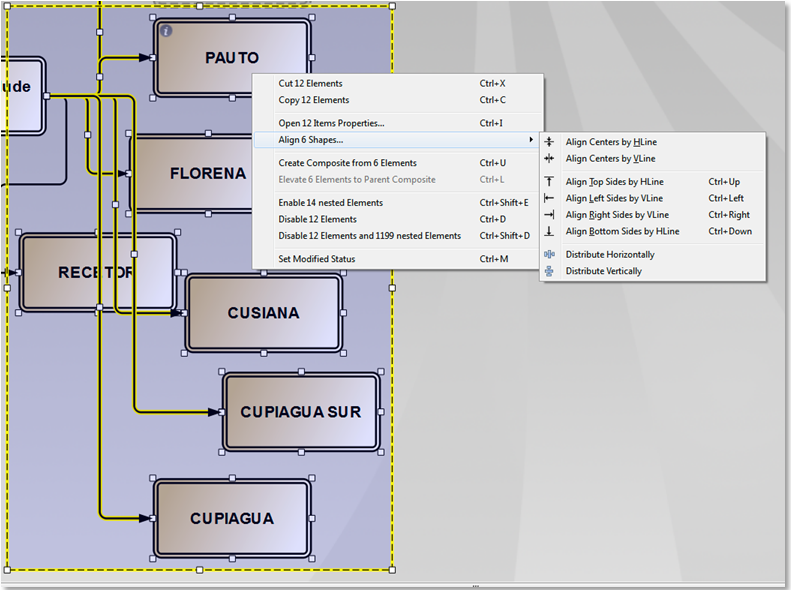
Alignments & distribution is also possible by the context (right-click) menu:
Item properties are available by making Right-button click on selected items, or by Keyboard shortcut - Ctrl+I (Mac: Cmd+I). Also it is accessible from
Edit > Item Properties...
The action shows tabbed interface for all properties of current or selected item(s) such as names, visual properties etc.
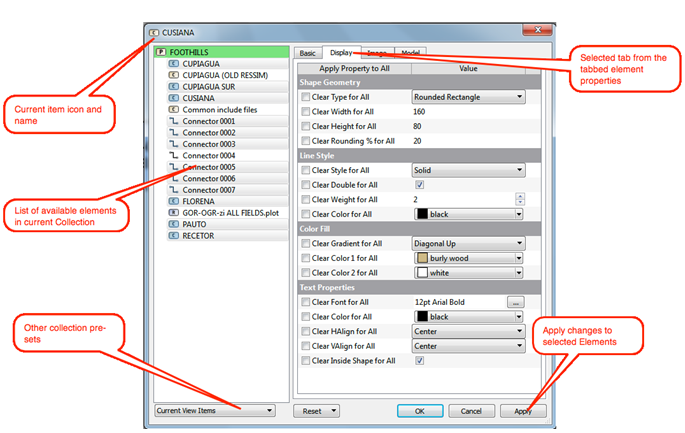
Now you can see it in details on the image. Left side contains list of available Elements in current Collection. You can select items which you would like to apply properties changes to by mouse or using Collection Presets button at bottom.
See Also: Collection Presets
Now we can consider all tabbed properties:
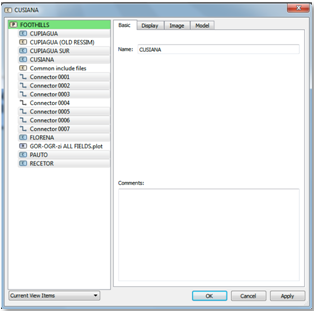
This page has Name and Comments properties. Note that Name is unique identifier so if you enter same identifier as already presented in current composite, the dialog will not accept it.
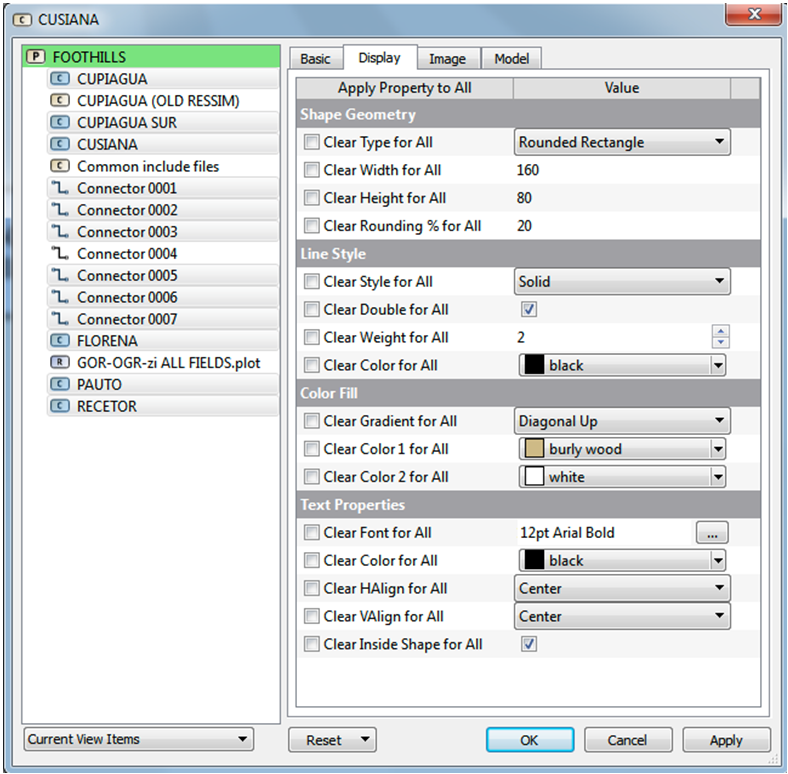
Display page contains all settings related how Element is shown on canvas. It can be grouped by next sections:
Shape Geometry ::
Here you can apply geometry changes and select shape type you would like to use for the item.
(for last case property rounding % is available)
If the Element is Connector then the section means properties of the line. In case of shapes the section provides properties of border line of these shapes.
The section allows you to change the fill color of elements. You can apply different types of gradient with color selection of begin and end points gradient. Also you can make your elements transparent by selecting appropriate Transparency property in color selection.
Here you can change font, alignment and text positioning around shape (inside/outside)
The page allows to assign picture to the Element and change such properties image placing as scaling, wrapping text and alignments.

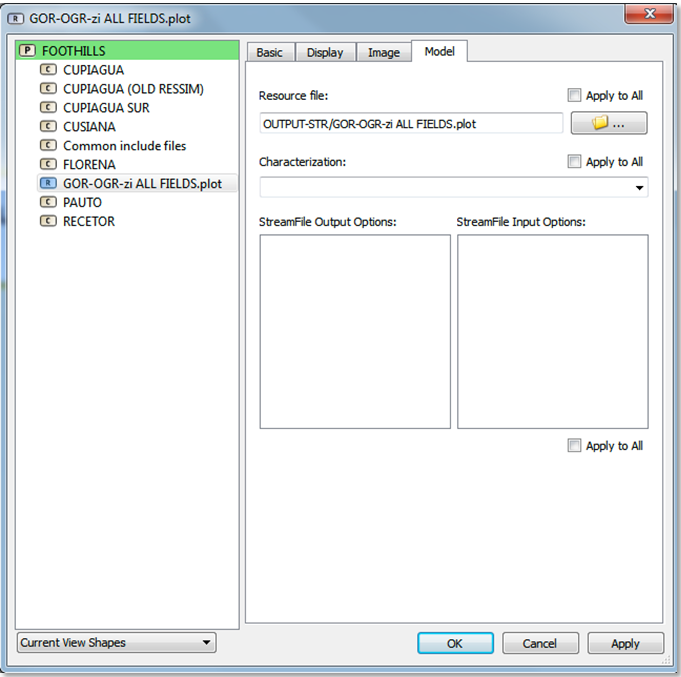
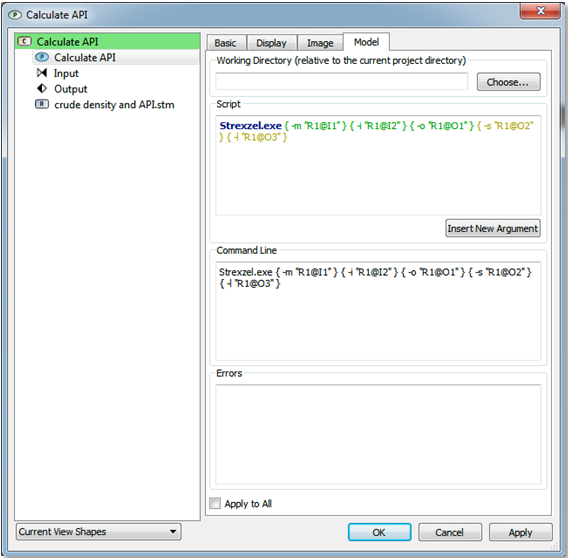
Model page has logic properties of project model depending of type of Element.
For example, in case of Resource they are File and Characterization file. Additionally, if the resource is a Stream file resource, Streamfile Input and Output Options may be entered here.
If the Element is Scripter, then page has same interface as dialog for editing scripts.
Composites have settings to select Parallel or Sequential Execution.

Double clicking behavior changes with object being double-clicked and the number of such objects.
Double clicking Resources launches the operating system (OS) association for the file type. It is very convenient if you have defined association to process the file or you have Text Editor bound to the file type.
Remember that with F4 or Context Menu > Edit Item you can open the resource file in the editor of your preference.
See Also: Text Editor Preferences for details about defining default Text Editor.
Double clicking Scripter Processes opens Edit Script dialog.
Double clicking the Composite leads you into the composite itself.
Double clicking the composite Socket opens a menu that allows you to navigate to parent composite or connected Resources or Scripters to locate them:
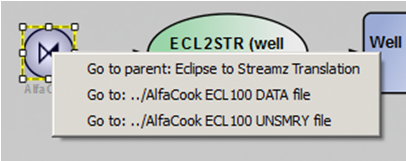
If there is a single item the socket is connected to, it directly navigates to that item.
Double clicking all other elements on the canvas leads you into the item properties. If you try to double click the canvas nothing will happen.
The right click menu is available when you right click on the canvas or when you right click on an element on the canvas. The options not available for a particular element, are grayed out. The menu will give you different opportunities explained below.
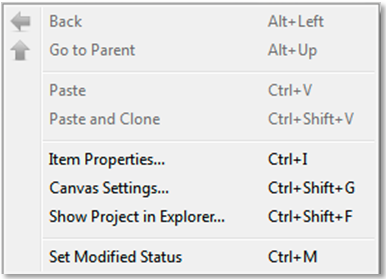
Right-click on the Canvas allows one to Navigate (if relevant), Paste/Clone (if relevant), Go to Item Properties for the Canvas, adjust Canvas Settings. Show Project in Explorer with open the Windows Explorer (Finder in Mac) and locate the project model (ppm) file. This is very useful for dragging files into the project as resources.
The Set Modified Status will set the out-of-date status of each element on the Canvas so that Pipe-It is forced to execute them, and thus any connected downstream elements, to bring them up to date.
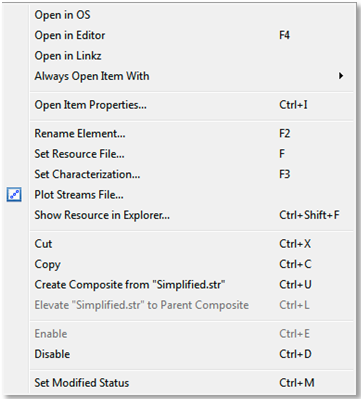
Context menu provides options for opening the item in several ways.
This item runs the OS association for the File which is assigned to the Resource. You can specify the the association in your system preferences or in your favorite file manager like Total Commander.
This one will run application which is set as Editor for the type of File which is assigned to the Resource. By default this is notepad window application (or TextEdit for Mac) and paint for image files. You can easily change these settings in the Preferences Window, Text Editor tab (you can access it with menu -> Edit -> Preferences...). Remember that you have keyboard shortcut F4 for the item.
Linkz has its own file viewer, optimized for showing and navigating large files to define links to values stored in these files. This menu item provides fast access to the Linkz File Viewer to define new links or edit existing ones.
For files which have already defined links to some values, the menu item shows you simple form for editing these values:
Without Save button, new changed values are written to the file.
See also: Linkz
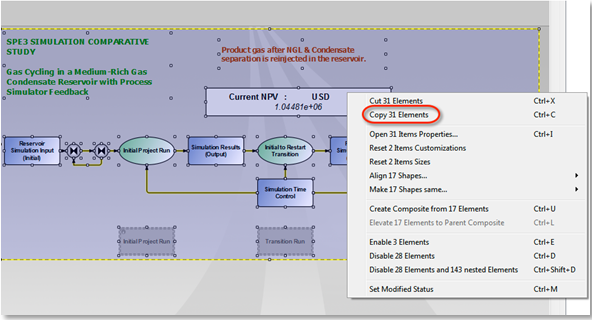
When you choose this option a menu will appear. On the left in the menu you may pick the elements you want to alter, either by picking them manually, or by using the filtering function.
See Item Properties for details.
The function, Create composite from Selection wraps all that you have selected together into a composite. If things are connected, it takes care of the manifolds and distributors for connecting the elements inside the composites to the elements outside.
If you choose elevate to parent level, it will move the element you right clicked on up one level in the hierarchy.
You can also just pick an element and drag it into a composite element if you want to. The software will take care of the connections for you, but you may want to change the appearance to make it look the way you want.
Here you can see what the different elements are connected with (Connector names). This can be useful when you have elements inside a composite connected to another element outside the composite. Also you will get a question about this if you have one resource outside a composite, and two input sockets inside the composite. If you then make a connector from the resource to the composite, you will be asked to which socket you want the resource to be connected.
This gives you the opportunity to rename the element.
Here one may associate a resource to its originating source of information. This is typically a text file. This option is only available for the resource element.
Although this will be shown for all resources, this is relevant only to stream file resources that will participate in Streamz Processes. Once invoked, the database of characterizations in the Streamz Library are offered for selection.
This option could be useful in case one might want to open the linked file with another application than the one used while double-clicking.
For example, .str files are associated with Strexzel but if the user would like to open it with Excel on a special occasion, this option could be used to locate the file in the Explorer and the use of Window's "Open With" context menu item.
This option is only available for a Scripter. This allows the specification of the script to be executed when this process is launched by the runner. This is done by setting the command in the box that appears when one chooses the Set script command option.
For utilities provided with Pipe-It there is another, maybe simpler way to set this command. Choose the option Item properties by right-clicking on the process and click the Model tab. Here a button called “Open Utility Editor” appears. Click on that and one may choose the most used utilities. This way much of the work writing the script command is done automatically, but it is only an option for the utilities included with the software.
See Using Utility Method for details.
Enable let you enable an element that you previously have disabled. Disabling an element can be done if one does not want it to be included in the project execution at run time. Although visually the element is part of the project the runner will exclude it when determining the execution order and that actual run.
Pipe-It keeps track of the “up-to-date” status of each and every element and runs only those that are not up-to-date. This could be critical in huge projects with large run times of individual parts. Set Modified Status is an option that is used to force the model to be rerun from a specific point. Even though a resource is up-to-date the user can force Pipe-It to include the resource in the run.
To view or change settings of canvas of current composite:
Choose Edit > Canvas Settings
The dialog allows to change canvas size using predefined sizes and select the way of filling background of canvas. By default all new projects get Petrostreamz background image.
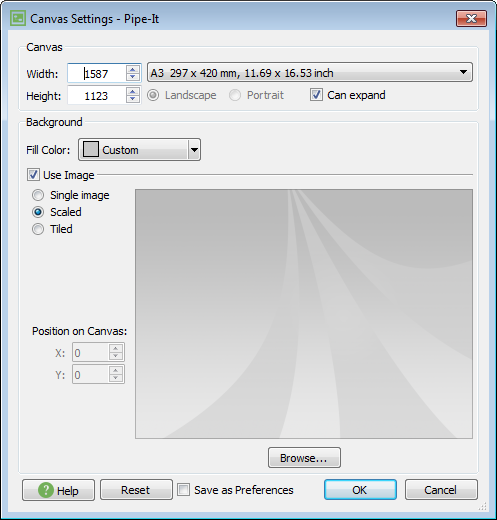
You can fill background with color or image which can fill canvas in next 3 ways:
Browse button allows to select image from Project images.
By checking Save as default for new projects your new settings will be saved as default for all new project you will create in Pipe-It next time.
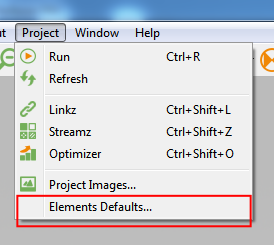
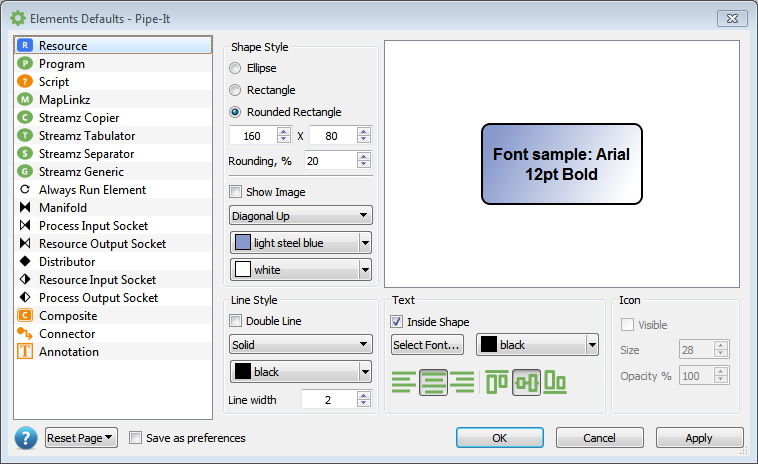
The default appearance of graphical elements can be changed through the Element Default settings, accessed through the "Project" menu:
The different elements are selected from the left side panel. The default shape, color, and font for new elements added to the project can be changed. By checking "Save as preferences" the specified element defaults will be used for all new Pipe-It projects.
The Element Default settings will only affect new elements added to a project. Existing elements are not updated to reflect the new appearance.
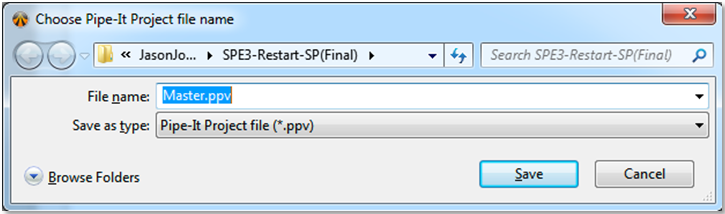
Pipe-It projects consist of two files which define logic and view. Logic is defined in ppm file. View in ppv. Ppv is the main file for user interaction. Users double-click (or drag-drop) this file for opening a Pipe-It project. When the project is saved with a name .ppv is the extension. Behind the scenes corresponding .ppm files (& .ppl/.pps if needed) will be saved.
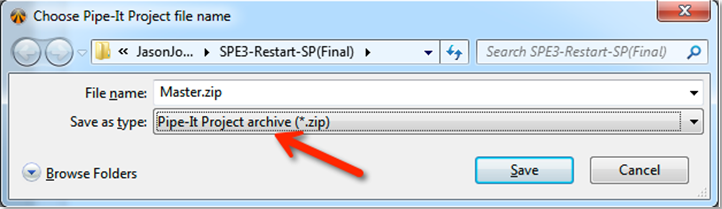
Remember that Save As stores only model and view files and do not do anything regarding files bound to Resources. So if you save your project under another location, you have to copy all supplementary files.
One way to copy all files bound to resources is to save as a Pipe-It Project Archive:
Once the model is built and the end user pushes the run button, Pipe-It will validate the model and return with visual element describing the status of the model. Each resource and process will initially be marked with a (light bulb) indication that the element’s status is pending.
 - means that the Element is under processing now or pending processing.
 - execution of the Element completed OK.
 - execution affected the Element, but did not execute it.
 - Element is broken due to problem in execution.
 - processing of the Element is incomplete.
Once the model starts processing the individual elements, the element will either turn the status to OK with a (green tick mark), or if some problem has been encountered, show a (red flag ). Notice that the status of the elements will be updated in the Pipe-It Explorer (Tree View) as well.
While running the model, the Runner will output text to the Pipe-It Standard Output (Console) window. Any error or warning messages will be displayed in this window. The Pipe-It Standard Output window will be refreshed for each run and the end user is urged to copy and paste the results into an editor, or save as a date-time-stamped log file to compare the output from two consecutive runs.
Exporting the current Canvas as an image is as simple as selecting all items (Edit/Select All or Ctrl-A), copying them to the clipboard (Ctrl-C or through the context menu), and pasting into the target application:
As explained in an earlier section, one can use the File/SaveAs menu item to export the complete package as a zip file including all folder structure and all files that have been connected to resources. This is a wonderful way to package your project for sending out or exchanging with your co-workers. All files in the project root folder are included but only those files that have resources in the project are included.
To use it profitably, users should try to always have a resource representation to any file that is important to the project. i.e. there should not be any "hidden" file.
Use File > Import menu
Import Composite provides way to import separate project as composite into current canvas. It allows to exchange parts between projects using Export/Import Composite features.
Import Composite opens Open PPV File dialog which allows to locate ppv file and loads it as Composite object into current canvas. The composite is inserted into top-left corner of canvas.
A second way to import a Composite is to just drag the .ppv file onto the Canvas from the Explorer window. A choice is offered to Insert a Resource or Import a Composite.
To print the Canvas, use the "File > Print" menu.
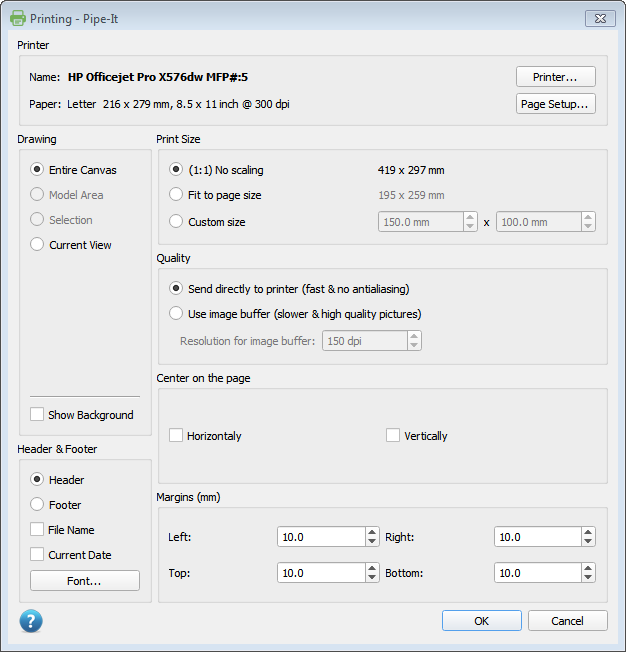
From this dialog the section of the Canvas that should be printed can be specified. It is also possible to specify the printing quality, if the Canvas background should be printed, etc.