Linkz is the technology that allows user to pin-point numbers in text (and Excel) files and denotes them as variables of the Pipe-It project. An intuitive and robust fingerprinting method is used, customized by the user to uniquely define the location of the number with respect to surrounding "tokens". These numbers can then be read and written by Pipe-It standard runs and for optimization. Repeatedly and without regard to their original line in the file. Columns/Rows and whole matrices are supported. Text tokens too, though they can not be used in the Optimizer.
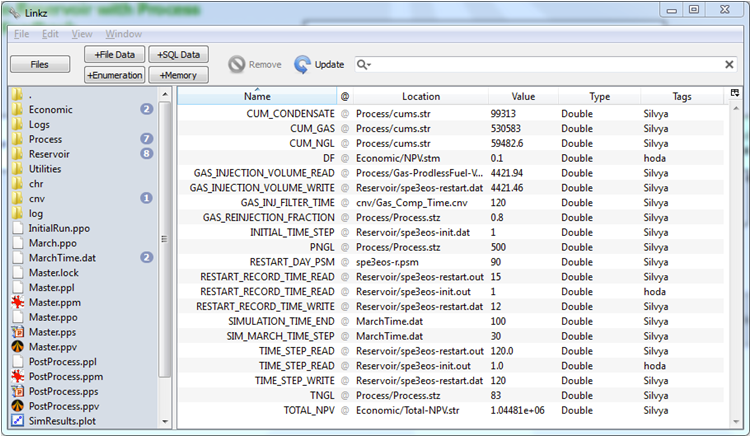
The Linkz windows (also called the repository) is a visual representation of the project_name.ppl file and contains the entire Linkz variables defined in the project. This is a good place to orient oneself to a new project's variables. On the left is a file/folder window with tags showing number of links in each file or folder. Each Linkz variable is identified by a name and a location (file).
The current value in the file can be interrogated by clicking on the refresh icon that apprears when the mouse pointer is close to the value:

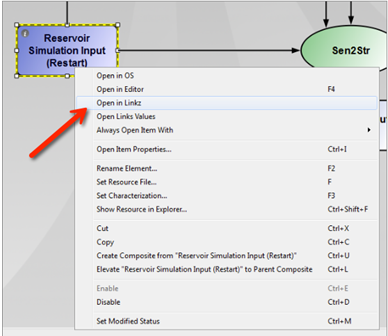
All links in Pipe-It are handled via Resources. To create new link in a file, ensure that it is represented as a Resource on the Pipe-It Canvas, right-click it and select Open in Linkz:
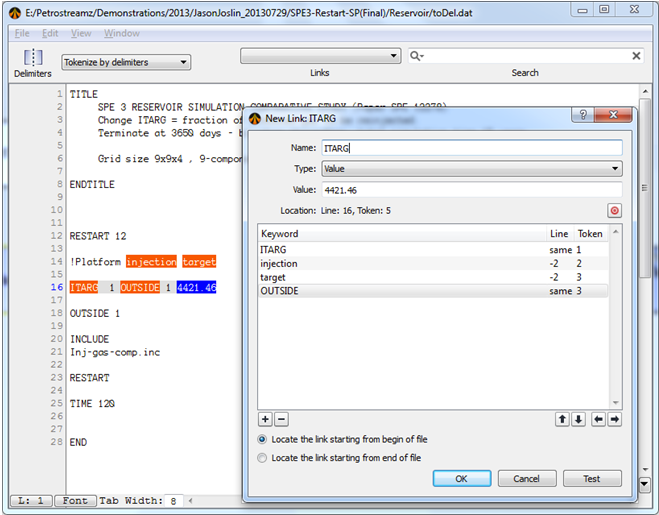
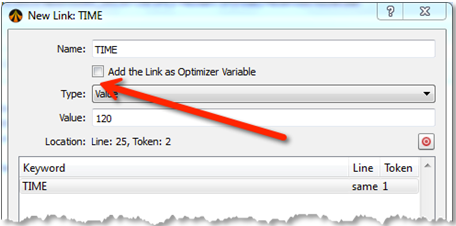
For most text files it opens in the Linkz File viewer. Find the number you are interested to link to. You have the Search bar to help you locate it for the first time. Double-click this number. It turns blue and opens a "New Link" definition window with suggestion for the Name, the value it has read and the first keyword it has selected (in red), to identify this value. The current location of the value is mentioned (5th token on line 16) and the property of the keyword (1st token the same line as the value) is shown.
See also:
Excel File Viewer
OLGA File Viewer
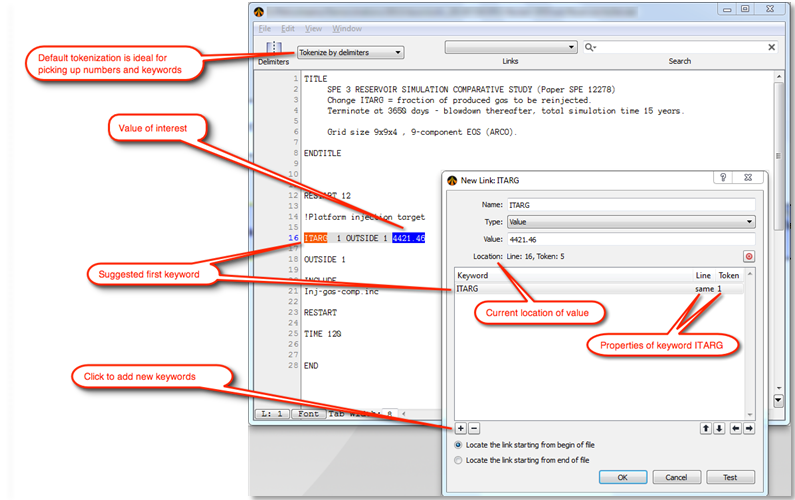
Additional keywords can be added on lines both above and below the line where the value of interest resides. Each such keyword is highlighted red in the Linkz view clarity.
Once the OK button is pressed, the link is colored green and is also added to the list of Links at the top of the Linkz Viewer:
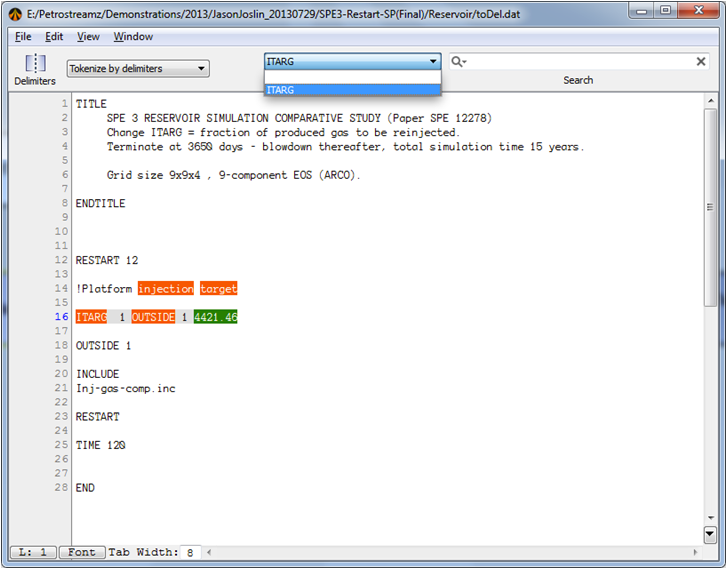
The file viewer window provides good visualization of links locating. All link values are highlighted with green color to indicate places where Link is watching for values. If you click mouse on the green are of link to select it, the file viewer will highlight keywords used for locating the value. These keywords can be located around the value on above or below lines.
When Linkz searches for the value of link, it looks for such "fingerprints"- value with surrounding keywords. Of course, it is not necessary to have these keywords unique, and often it is not possible to find such unique definition in case of repeating some blocks of similar text in file. In such situation, Linkz counts occurrences of matches and choices defined occurrence.
Also there is a way to start the value look-up from the end of file. Then Linkz counts occurrences of matches from end. It can be extremely useful for files with iterations - file is compound of blocks of almost same content and only last block contains values that should be linked. Because the amount of these blocks is not the same on each execution, it makes sense to start the value search from the end of file.
Let's have a closer look at the link definition.
Double-clicking an already defined link brings up the same dialog to edit the link.
First you can see the link name and value. Links name is editable - so you can rename your link. Below there is an indication of location - line number, index of token in the line, occurrence and buttons with arrows to adjust the position of value (they can be useful if after file modification links found wrong token and you need to adjust line or token index). The list of keyword has also similar buttons for adjusting positions of keywords. With plus and minus buttons you can add additional keywords or remove existing. By default just added keyword is the first token in line. So, after adding, you move it with arrow button to position where your keyword is located. Finally you have option to enable the link look-up from the end of file. With Test button you can test your link - then you can see updated occurrence.
We recommend to use at least 2-3 keywords for better definition of location and to have occurrence equal to 1 - which means that it is the first found location from the beginning or end of file.
If you work with huge file and your value is located at the end of file, then it is recommended to use Locate the link starting from end of file. Otherwise it has to parse whole file from the beginning to find the location. In case of 100MB, it means minutes and if you are using the link in some operations in your project, it can slow down the execution.
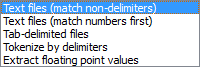
List of currently defined delimiters are provided in the drop-down menu:
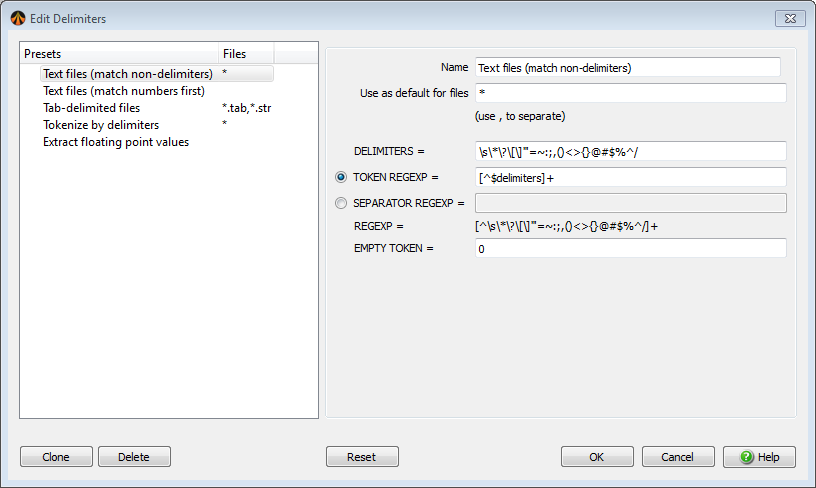
Each delimiter is based on a particular regular expression that will be used for both the values and the keywords.
The actual expression, ability to edit those expressions and to store new presets with modified delimiters is obtained by clicking on the Delimiters button to get the following window:
There are two methods how the content of a file can be split into the cells and the whole file is represented as one huge table of tokens.
The Tokenization method means that during the splitting, the regular expression will be used to match the content of the tokens but not the separation entities. As a result of such approach, all separators are just omitted, but also they are not matched and counted - so this method can not handle cells (tokens) containing empty content.
Example: We would like to split line : "cats;;;dogs;dolphins using regular expression to match everything except symbol ";" - "[^;]+". As a result of tokenization method, you will get table:

But there is no way to get table containing two empty cells which are suggested to be between cats and dogs.
The Separation method uses opposite approach when defined regular expression will be used to match the content of separation entities. In this case we can count and match empty tokens/cells. If we consider example above and use regular expression to match symbol ";", then all separators will be counted and matched separately and the result table is:

One major reason for creating links using Linkz is the ability to use them in optimization. The only way Pipe-It Optimizer can read/write values in files is via Linkz. So there exists a short cut to add the link being created as an Optimizer Variable. However, the Optimizer must have been invoked at least once during the Pipe-It session for this check box to show up:
The other major use of links are Pipe-It's ability to pass links from one file to another using MapLinkz. MapLinkz is discussed further in this section but the power of MapLinkz becomes apparent when rows, columns and entire matrices are transferred.
Before such large chunks of data are transferred they have to be created. The type of link (default = single value) is defined in the drop-down menu:
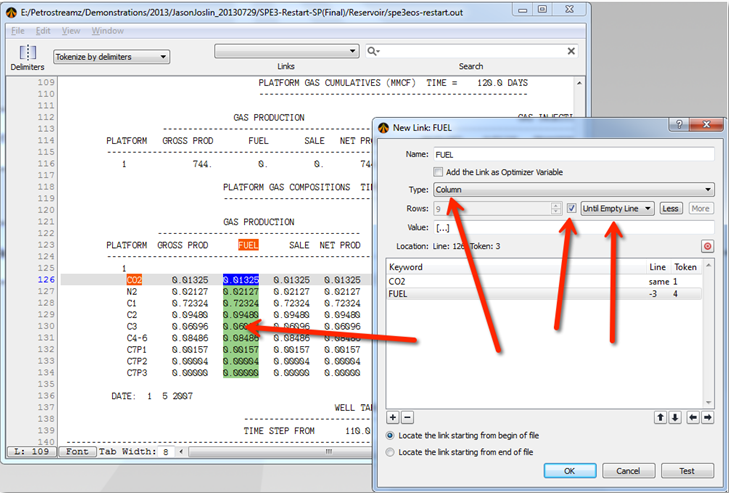
The GUI elements are involved in a column link definition.
When matrix links are being defined, special care should be taken since the behavior is so mimic that of a spreadsheet.
a) Tab-delimited should be used and tab-delimited Delimiters should be chosen.
b) If the table (matrix) is in a non-tab delimited, file expansion and shrinkage of table content is likely to be erroneous.
c) Less and More buttons should be used to specify behavior when the source matrix has less or more data than the receiving matrix link.
d) With carefully planned matrix links very powerful spreadsheet style transfer of tables from input to output resources can be achieved.
e) Array/Matrix links require element specifications in the Optimizer since each variable expects a single value.
Note: Only available on a Windows computer with Excel installed.
Links to Excel files can be created through a custom interface. Simply add the Excel file as a Resource on the canvas, right click it and select "Open in Linkz". A dialog as the one shown below will appear, where links can be defined. Each sheet in the workbook is located in a separate tab.
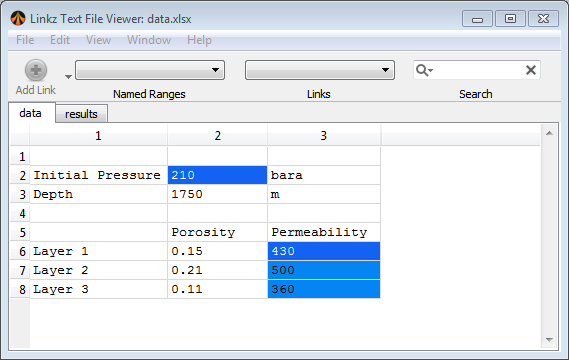
The Excel file viewer functions similarly to the default text file viewer. It is possible to link to single values in the Excel workbook, or to link to vectors or matrices. The keywords used to locate the linked value in the workbook can be defined in the same way as for text files. See Edit Link Dialog.
It is also possible to use Named Ranges to locate links. Any named ranges in the Excel file will be marked with blue background. To create a link to a Named Range, simply double click the cell with a Named Range defined. A new dialog will appear:

Specify the name of the link, and click OK.
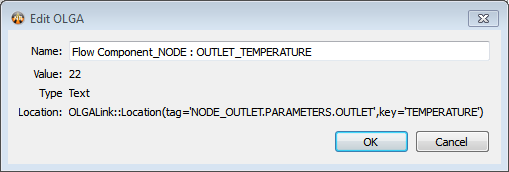
Links to OLGA model files (.opi) can be created through a custom interface. To create links to the OLGA model, add the .opi file as a Resource on the canvas, right click it and select "Open in Linkz". A dialog as the one shown below will appear.
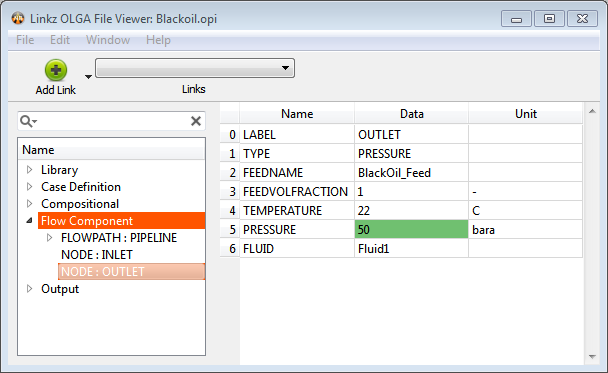
The dialog consists of two parts. The model structure is shown in a tree list to the right (Model Explorer), and the properties for the selected model element is shown to the left. Any properties with existing links are highlighted with green background.
To create a link to a value / property in the Olga model:
1) Navigate to the desired model element with the Model Explorer.
2) Double-click the property you want to link to. A new dialog like the one shown below will appear.
3) Select an appropriate name for the link, and click OK.
Note: Many properties which are set to their default value, will not appear in the the list. To show them, open the opi file in OLGA, and find the property you interested in changing. Change the default value to something else. Pipe-It will now be able to find and modify that property.
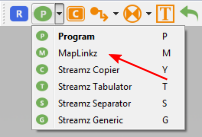
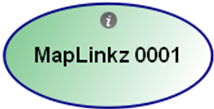
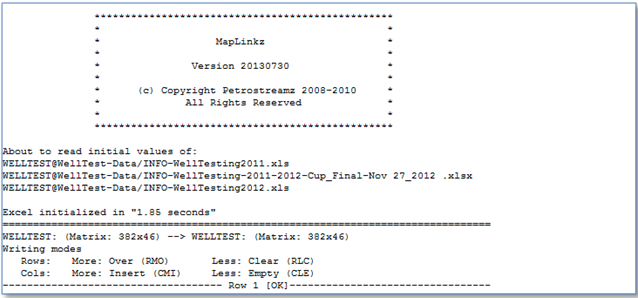
MapLinkz is a specialized Program/Process that is available from the Process pull down menu (or just pressing "M" on the keyboard). To differentiate visually from other processes, MapLinkz has dark blue boundary.
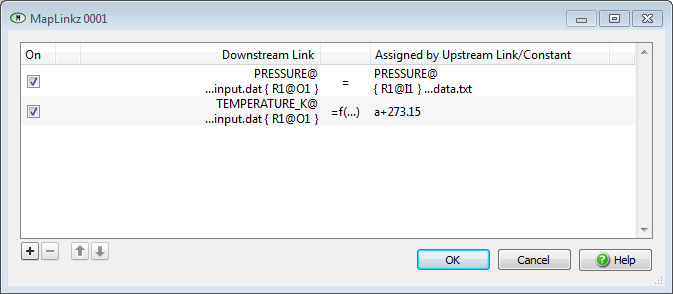
Just like any Program (Script), MapLinkz has input/output sockets for connecting Resources. These define the files that can be used for transferring their links from the input to the outputs. Double-clicking MapLinkz opens the mapping interface:
MapLinkz also reports to the console detail information about the particular operation. This is very useful when setting up the link and ensuring the proper and complete data being transferred.
MapLinkz can be used to either directly assign an upstream Link value to a downstream link, or to calculate the downstream value based on an expression.
By default direct link assignments are used, where the value of the Link or constant in the "Assigned by Upstream Link / Constant" column is directly transferred to the Link in the "Downstream Link" column. Direct link assignment is indicated with an equal sign (=) in the middle column of the table.
It is possible to calculate the value of the downstream Link based on an expression. This is useful for e.g. unit conversions. To use expressions, double-click the middle column in the MapLinkz table, and select "Calculate Expression". Link assignment by expression is indicated with "=f(...)" in the middle column of the table.
The expression is defined by double-clicking the corresponding cell in the "Assigned by Upstream Link / Constant" column, which brings up the following dialog:
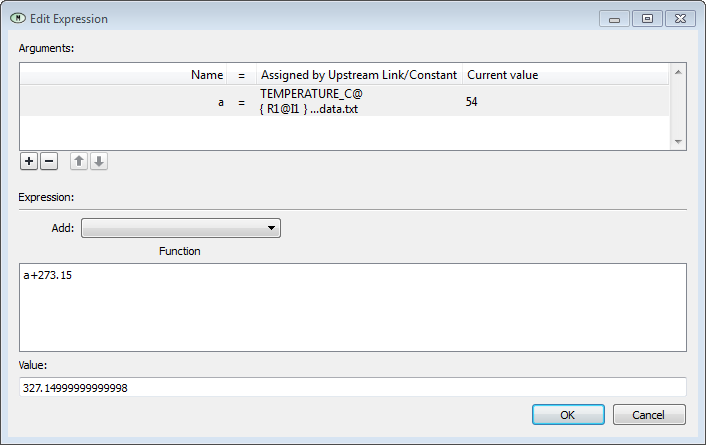
Arguments referring to upstream Linkz or constants can be defined, and used in the expression below. The calculated value of the expression is written to the downstream Link.
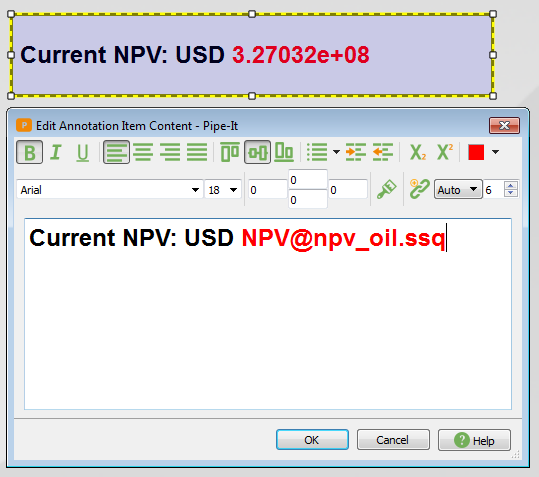
In addition to Optimizer and MapLinkz, links can also be used in Annotations to display their dynamic values on the Canvas directly. A button in the Edit Annotation window triggers the Insert Link dialog, which allows selection of the link to be specified.
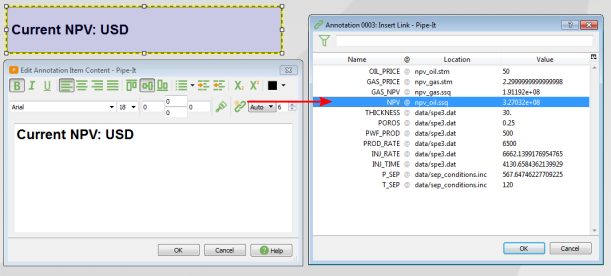
It appears on the canvas with the formatting set in the Edit Annotation window: