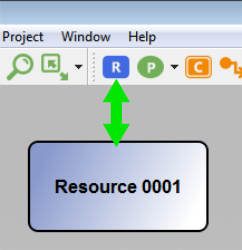
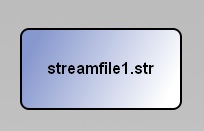
Resources are representations of files on disk. The default shape is a rounded rectangle with a pale blue color. They should usually be renamed to something appropriate in the context of the project. They need to be linked to the appropriate file on disk via "Set Resource file" context-menu option. An easy way to create a new (or multiple) resource is to drag the file from file explorer on to canvas. This creates the resource, gives it a default name and also set the file linking in on quick step.
Resources are connected to other processes only but never to another resource directly.
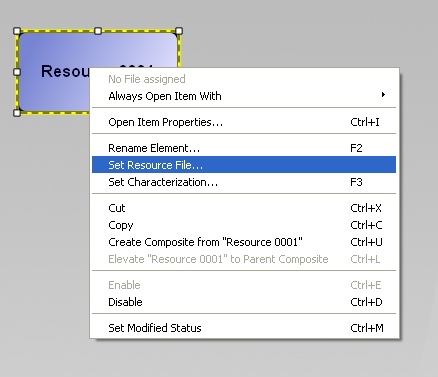
Right click on the resource and select "Set resource file" to associate the resource element to a physical file.
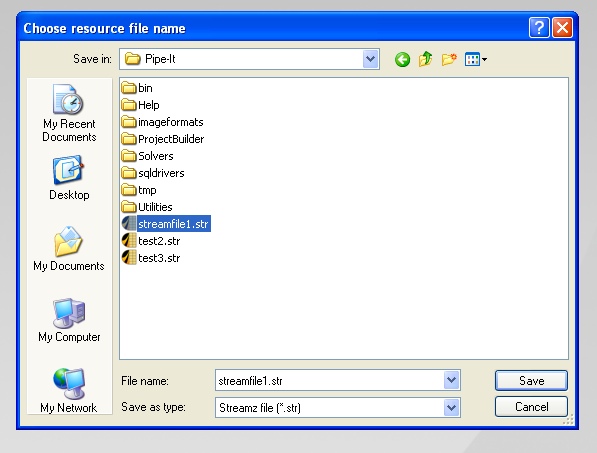
Select a file and press "save" to associate the file with the resource element.
The resource element on the canvas will be updated with the file name.
The element can be renamed to a more convenient name by pressing F2 and typing in a new name. It will still be associated with the selected file.
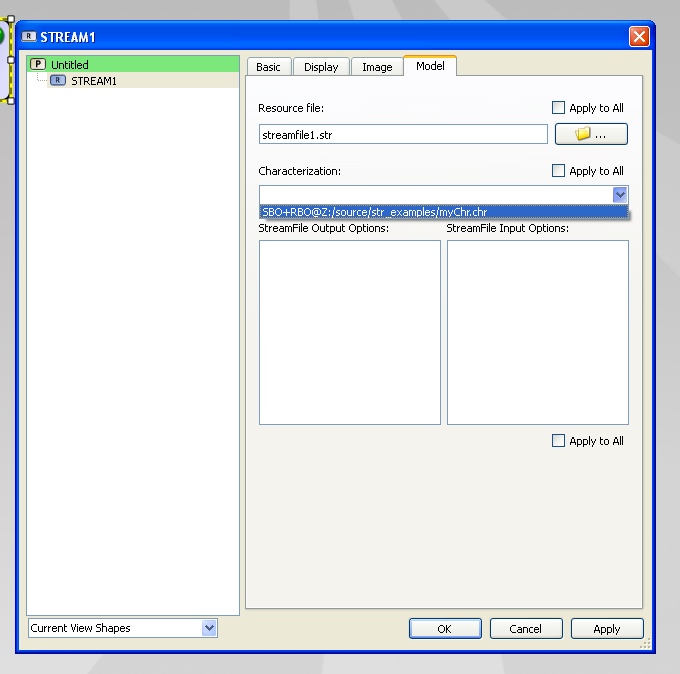
If the resource points to a stream file, a characterization name can be associated with the stream file by pressing F3 and typing in the name.
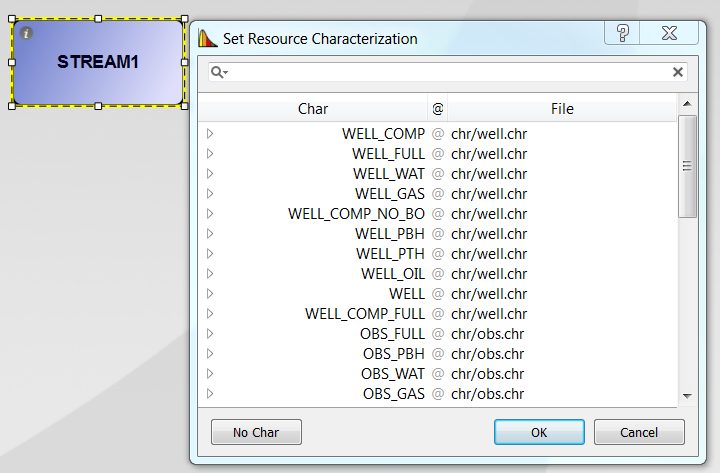
Pressing <CTRL>+<I> will open the item properties dialog, where the various properties can be inspected and modified. If characterizations have been added to the project via Streamz Library (<CTRL><SHIFT><Z>), these will be available in the Characterization dropdown. Stream file input and output options can also be defined in this property page.
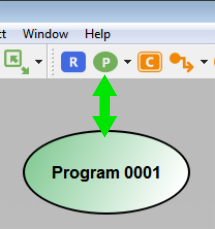
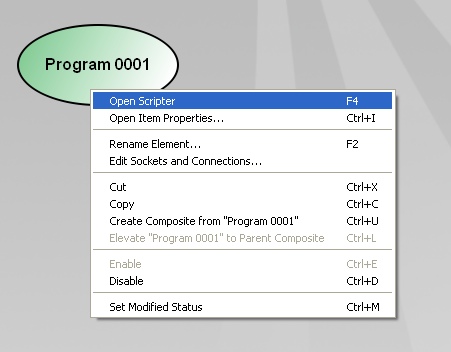
Programs are operations that modifies an upstream resource to create a new downstream resource . The default shape is an ellipse (oval) with a pale green color. They should usually be renamed to something appropriate in the context of the project. They are usually connected on the upstream and the downstream sides to resources. They can never be connected directly to another program. The most often used program is a generic Scripter where the user can specify any command line for execution. A program canvas element can be created by clicking on the "P" icon in the toolbar and dragging the ellipse on to the canvas.
The application executable and its command line arguments is described in the scripter properties dialog. Select the process and press <F4> to open this dialog, or open it from the context menu.
The scripter command line can be explicitly entered by the user. For example, if the scripter launches the reservoir simulator SENSOR and first argument is the input data file, the command written into the scripter would be:
SENSOR.exe input.dat
Pipe-It allows a flexible syntax to make projects and programs portable by using reference to connected resources. The files actually connected to those resource will then be used to make up the command line on-the-fly at the time of execution.
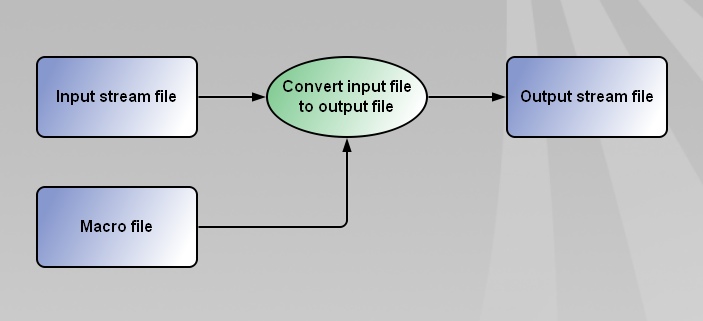
To illustrate this, let's set up a process for converting a stream file with the Strexzel application. We will need an input stream file and a macro file. When the program executes, it will produce an output file.
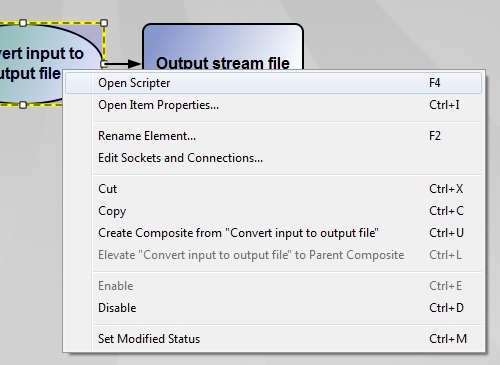
Let's select the program and open the scripter properties dialog. You can do this by selecting the program and by pressing F4, or by selecting "Open Scripter" from the program context menu.
![]()
You get a window, divided into 3 parts. The first part with the label "Script" is a space for you to write the command required to launch your program.
In the example below, we have used the Strexzel utility. A normal command line invocation for Strexzel for opening a stream file, running a macro file and writing the output result to a second stream file is:
Strexzel -m <macro file> -i <input stream file> -o <output stream file>
First we need to type in the name of the application that we want Pipe-It to execute when the project runs. In this case, the application name is "Strexzel". The simplest way to populate this script area is directly file names. However the user needs to know exactly the names of the files (including the path relative to the current folder). Suppose the files are located in the current folder. The following picture shows what Script may look like.
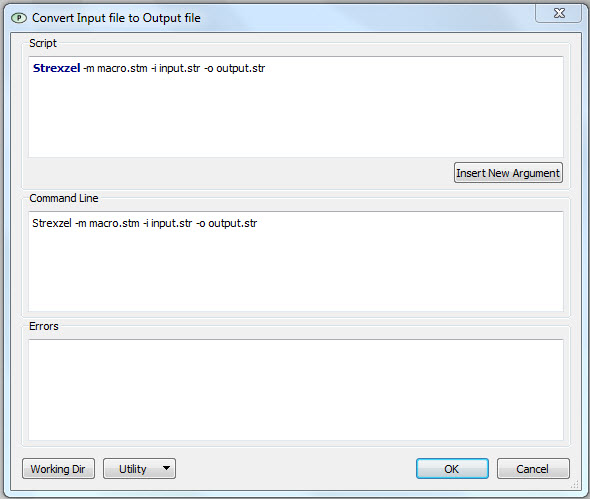
In this case the Script and the Command Line are identical.
However Pipe-It is designed to provide the names of the files needed as arguments on the command line automatically, if a Resource (set to a file) is connected to the Process using a Connector. In fact, that is the purpose of connectors - to provide Processes with files (via Resources).
To use this flexible and more robust way of populating the Script, you need to use the "Insert New Argument" button. This results in a box with many choices. Many of the defaults can usually be used.
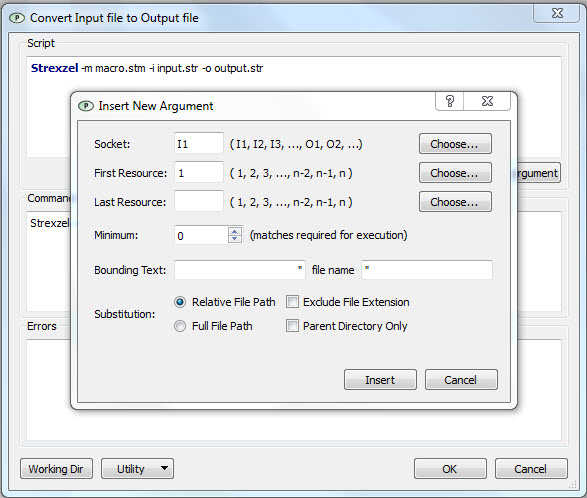
You need to decide what kind of file you are currently adding as an argument. In the case of the <macro file> argument, it is an input to Strexzel. Files (via Resources) get connected to Processes (or Programs) at certain connection points called Sockets.
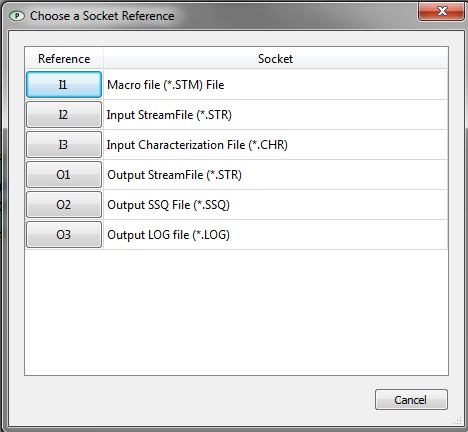
Since we have used the generic program, we will instead see a list of generic socket types:
This displays a list of resources connected to the program via input sockets. By default, each new Process has two Sockets, an Input and an Output Socket. This can be accessed by the "Choose..." button in front of the Socket choice in this window. Selecting this button would show up a small window like:
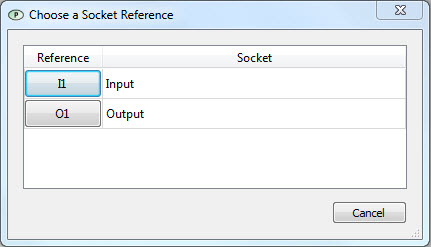
Clicking on the button of your choice will select it and take you back to the original window.
If the program had been created using a utility, or a user had added more sockets, a list of recognized sockets would have been displayed.
Since we are working with a simple example with two input files and one output file, we proceed with the default sockets and stick with I1 (First Input Socket).
We need to set the resource that will be used as the first argument. We click on the "Choose..." button in front of First Resource to get the following dialog:
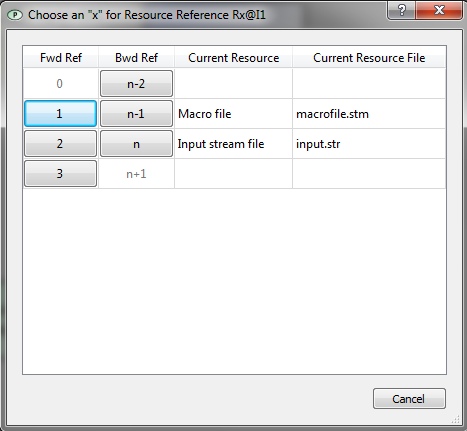
The dialog lists the resources that are connected to the chosen Socket (I1 in our case) of the program. We can select the resource using the forward referencing or backward referencing index. In the forward referencing scheme, an integer index is assigned to each resource. In the backward referencing scheme an integer reference relative to the number of resources is used. If we have three resources and want to reference the second one using the forward referencing scheme, we will use the index "2". If we want to use backward referencing, we will use the index "n-1".
In this example, we will use forward referencing. Since we already have the resources (with files) connected to the Program, they show up under respective columns. We select the macro file by clicking on its index (1) in the forward referencing column. The dialog will close automatically after we have selected a reference.
Since this argument also needs a switch (-m) we can specify it as part of the Bounding Text entry as shown in the figure:
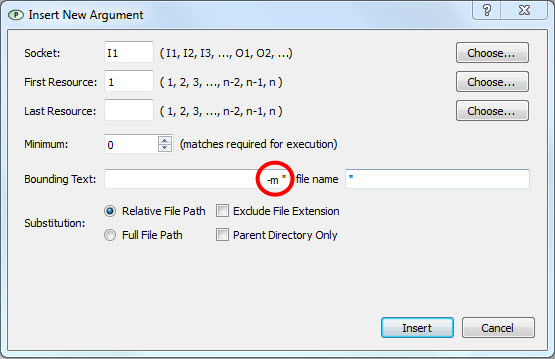
This ensures that the switch is written only if the argument is written to the command line (useful for optional arguments). When you click "Insert", you get a new entry in the script.
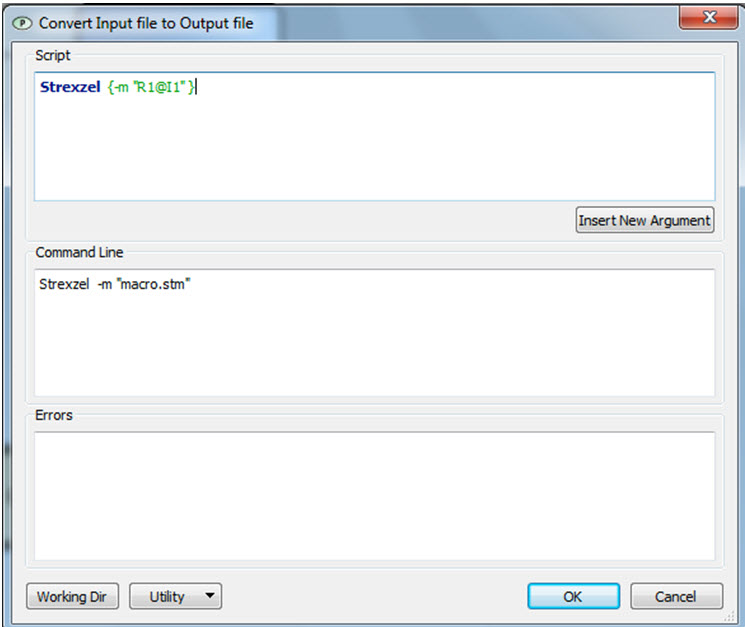
Here we see the Script and the Command Line are not identical, but the arguments are made up of Resource References that translate to a file argument. This is a flexible and portable way of setting up Programs in Pipe-It that can be reused. Just pointing a Resource to a different file can update the command line without the user having to do anything.
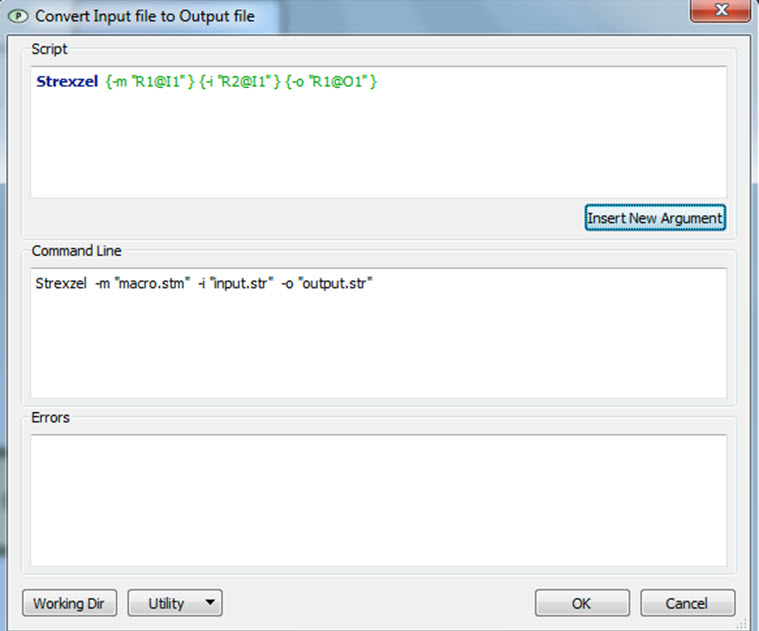
Following similar steps, other arguments of the Script can be added to complete the Program. It should look something like the figure below. Remember to select the 2nd Resource for the Input stream file and the Output socket for the Output stream file. Also remember to use appropriate switch entries (-i and -o) for appropriate arguments.
| Field | Mandatory | Description | Actions / dialogs |
| Script | yes | Describes an application command line using Pipe-It reference syntax. | Edit manually or compose by using the "Insert new reference" button. |
| Socket | yes | socket name to be inserted in reference. This can be an input or output socket. | Edit manually or open the "socket reference" dialog by pressing the "choose" button next to the field. This opens the socket reference dialog (described below). Selecting a value in this dialog will populate the field. |
| First resource | yes | The first resource name to be inserted in the reference. | Edit manually or open the "resource reference" dialog by pressing the "choose" button next to the field. This opens the resource reference dialog (described below). Selecting a value in this dialog will populate the field. |
| Last resource | no | This lets you select a resource as above, but it is only used if you want to specify a range of resources in the reference. The range is given by two indices using forward or backward referencing. | Same as above. |
| Minimum | no | The field "minimum" (matches required for insertion) indicates the minimum number of connected resources that has to be active for the program to execute. | Spin button for increasing or decreasing the value. |
| Relative / Fixed file path | yes | Defines the reference as a fixed path or a relative reference. | Select using radio buttons. Defaults to relative. |
| Exclude File Extension | no | If this is selected, the reference expansion will exlude the file extension. | Checkbox. |
| Parent Directory Only | no | If this is selected, the reference expansion will only refer to the parent directory for the resource. | Checkbox. |
| Insert | yes | Press this button to insert a new reference in the script field. The reference will be composed using selected values from the fields described above. | Button. |
| Error | - | Area to show when Script has unreferenced resources/files. | |
| Working dir | no | Defines the working directory for the program. | Pressing the button displays a field where the working directory can be defined. |
| Utility | no | Expands a list with preconfigured utilities. Selecting a utility from the list will preconfigure the contents. | The button opens the script translation dialog (described below). |
Notice that Pipe-It has preconfigured Program templates (utilities) for a set of bundled applications. By using these to define a program instead of the generic program icon, Pipe-It will be able to provide a full set of possible command line parameters.
Each argument in the Script is abstracted as follows:
Notice that Pipe-It uses its own abstractions for representing command line arguments. The command line switches and options are identical to a normal command line, but the argument file references are replaced with an alternate syntax. This syntax makes it possible for Pipe-It to create valid program command lines by referring to its own resource abstractions instead of referring to specific files directly. By creating a program representation with the Strexzel utility, Pipe-It creates the following command line for us:
Strexzel { -m "R1@I1" } { -i "R1@I2" } { -c "R1@I3" } { -o "R1@O1" } { -s "R1@O2" } { -l "R1@O3" }
This predefined command line contains all known command line arguments for the applications.
To illustrate this, let's set up a process for converting a stream file with the Strexzel application. We will need an input stream file and a macro file. When the program executes, it will produce an output file.
Since Pipe-It is aware of the command line interface for Strexzel, The command line
Strexzel { -m "R1@I1" } { -i "R1@I2" } { -c "R1@I3" } { -o "R1@O1" } { -s "R1@O2" } { -l "R1@O3" }
is generated automatically.
Connectors pointing to the program are interpreted as input, and connectors pointing away from the program are interpreted as output. Resources are referenced via input or output sockets. Sockets are identified by type and number.
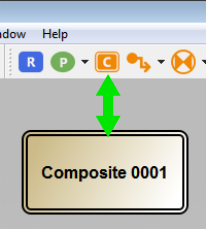
Composites are used to organize large projects with many resources and programs, and can be thought of as folders in a file system. They will compose parts of a project together into one box for a less cluttered appearance. Composites are created by clicking the "C" icon in the toolbar, and dragging the rectangle on to the canvas:
Resources and programs can be moved into a composite by dragging and dropping them over the composite. Elements inside a composite can be moved out, and up to the parent level, by right-clicking and selecting "Elevate to Parent Composite".
A more detailed description of composites can be found here.
Connectors are graphical lines with a single arrowhead denoting computational flow direction. By default they are black in color and come in two flavours: elbow connectors and straight line connectors. They are used to connect Pipe-It Resources to Processes and Processes to Resources. even when they appear to connect Composites they are actually connect to Resources or Processes within those Composite via sockets.
Connectors are intelligent entities and will give feedback to the user in the following ways:
Connectors are used by Pipe-It to determine order dependencies between Resources and Processes, and help decide what parts of the project can be run in parallel and what parts must be run sequentially.
Connectors also carry the resource file names to connected Processes and allow the Process command line to be generated on-the-fly. In such usage the upstream connector provide file names in direction of the arrow which the downstream connector provide file names opposite to the direction of the arrow.
Connectors can optionally be made to appear "animated" as if the computational information is actually flowing, for the connectors connected to the currently executing processes. Once the execution of such processes is completed the connectors go back to their "solid line" state. This behaviour is purely cosmetic and can be switched off in the preferences to save some CPU cycles.
Double-clicking on sockets inside Composites that connect to other elements will traverse to that element even tough they may lie many levels up (and down) in other Composites. This is also an intelligence feature of Connectors - they have knowledge of all connected elements.
Figure shows the two (elbow and straight) connectors being used.
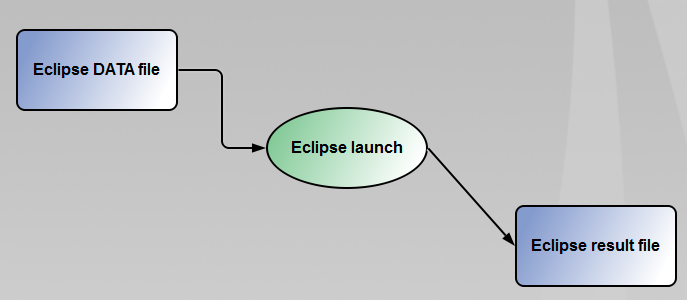
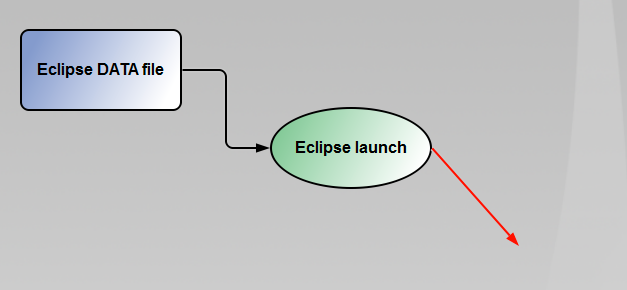
Figure shows the Connector becoming red when the connected Resources is deleted.
is generated automatically.
Connectors pointing to the program are interpreted as input, and connectors pointing away from the program are interpreted as output. Resources are referenced via input or output sockets. Sockets are identified by type and number.
Annotations are graphical elements drawn on the Canvas that do not have any bearing on the execution of the project. They are boxes containing formatted text mainly used for the purpose of:
To place an annotation use the tool on the tool bar (or merely the "A" key on the keyboard):

Using either, the mouse cursor will take on a placement "shadow" image that moves with the mouse movement:

Clicking the the mouse button will place the annotation at that location.

The annotation box can be double-clicked to edit the annotation:
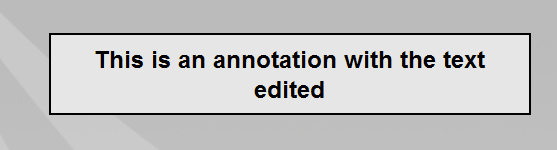
The edits can use most of the features of a rich-text editor to customise the appearance as shown below.
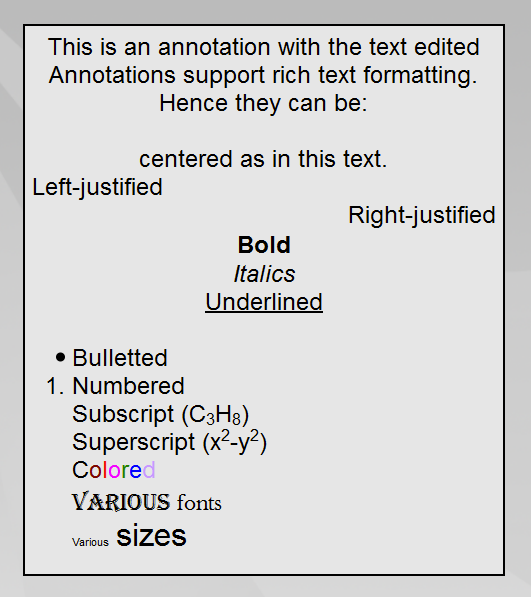
Annotations may also contain images and pasted content from e.g. Microsoft Excel / Word.
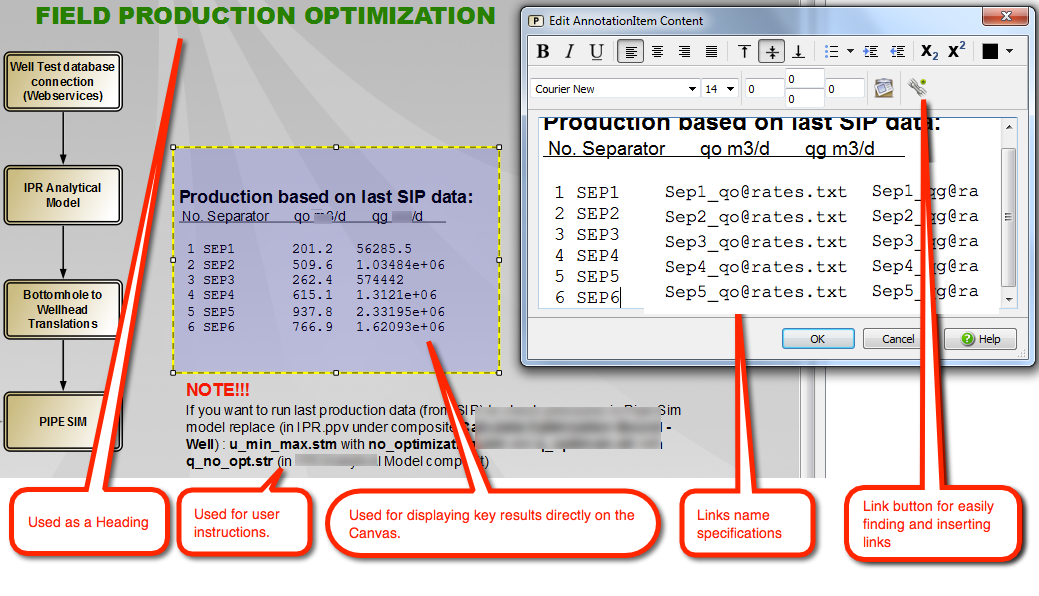
In addition live Linkz data may be embedded within the annotation. This is a powerful feature that gets updated with a new execution of the project. Hence a table of key results may be displayed directly on the Canvas without the user having to look them up in the Optimizer or Linkz windows or check out all relevant Resources for their values.
If an Optimization is being performed such Linkz embedded annotation may be used to track the iterations and also the value of key results as the optimisation is progressing!
Here is an image that illustrates all that various usages. It also shows the mechanism of insertion of Linkz in an annotation that shows up as a table of key results:
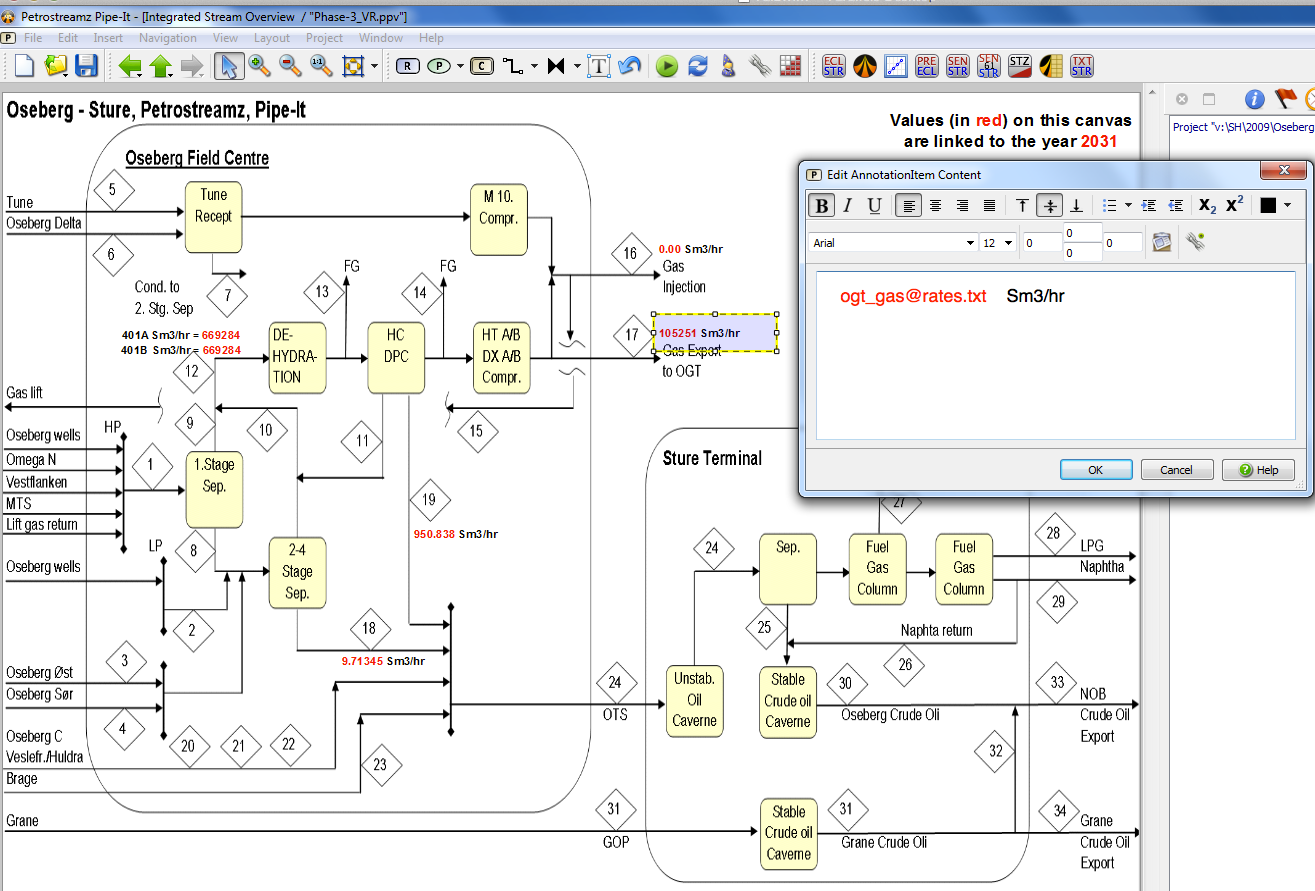
The following image shows an interesting usage where an actual image of a North Field offshore and onshore area is used as the Canvas and annotations are used at key nodes depicting actual values of flow at those nodes. Any new run of the project for a user specified "year" will result in new value (in red for emphasis) at each of those nodes. A screenshot of the Canvas can provide a historical record of past executions.
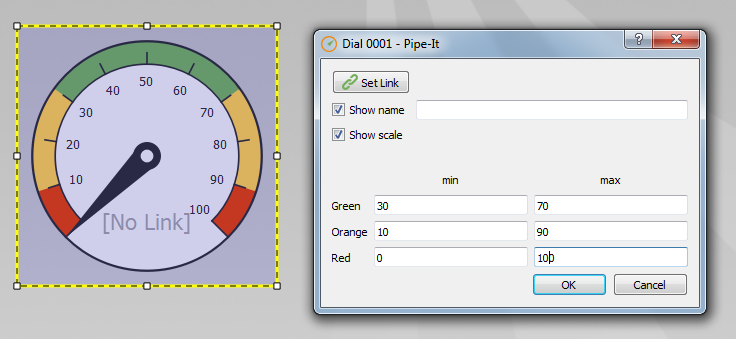
Dials are graphical elements that are used to display the value of Linkz.
To place a dial, use the tool on the tool bar (or merely the "D" key on the keyboard):
To edit a dial, double-click it. The following dialog will appear:
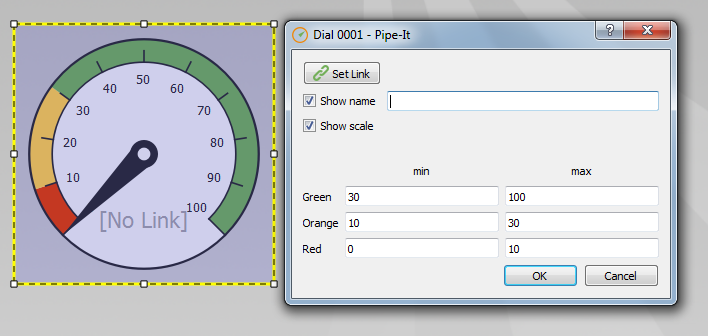
From this dialog you can:
It is possible to have two-sided orange and red intervals:
Linkz Line Edits are graphical elements that are used to input values to Linkz in Resources associated with the project.
To place a Linkz Line Edit, use the button on the toolbar:

To configure the Linkz Line Edit and assign it to a Link, double-click it to show the following dialog:
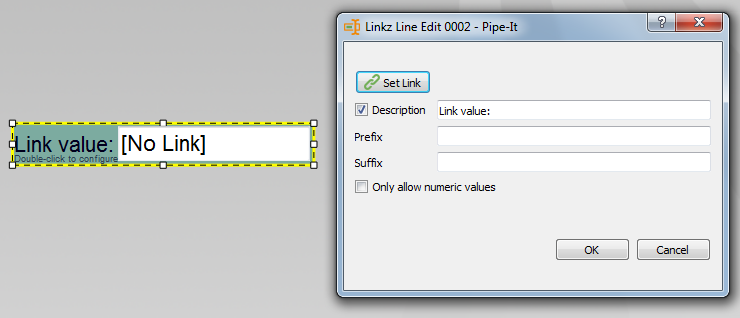
Available properties:
Once the Linkz Line Edit has been configured and assigned to a Link, double-clicking it will allow you to enter a new value:
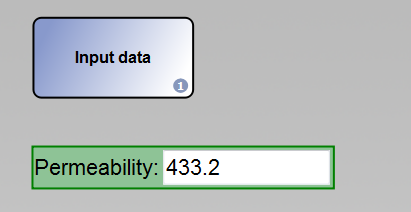
Press enter to save the new value, or click outside the Linkz Line Edit to cancel the edit.
The configuration dialog can be accessed again after the initial configuration through the context menu.
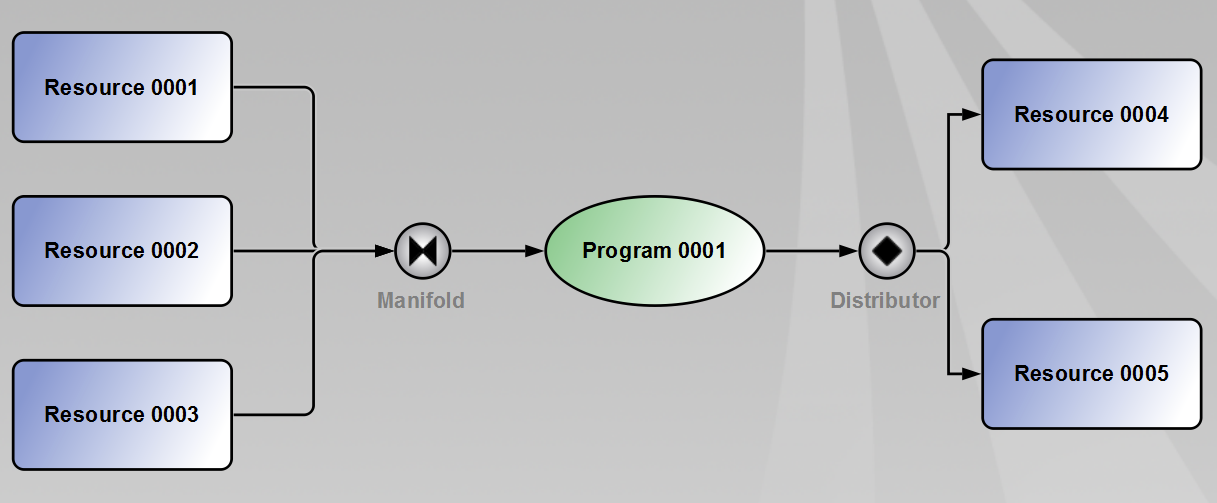
Manifolds are collectors of multiple similar graphical elements that can then be connected to a downstream element with a single connector
Distributors are opposite of Manifolds in the sense they are typically used to route a single element to multiple downstream elements.
Examples of Manifolds and Distributors are shown below.
Always Run Elements are used to force execution of a particular Process or Resource. Any Process or Resource connected to an Always Run Element will be executed every time the project is run, regardless of whether any upstream dependencies are modified or not.
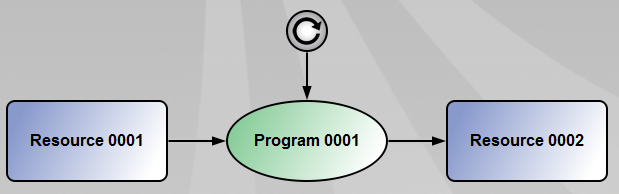
Pipe-It runs projects in an efficient manner. Only outdated parts are executed. All resources in the project are checked for modification dates of files to decide which part of project should be executed. This avoids unnecessary execution of the same Process in subsequent runs to generate identical data.
In some cases a portion of the project should be executed each time you press Run button. For example, imagine a project which fetches input data from some network services (e.g. Web Services). Before processing the rest of the project there should be a mechanism to get updated data from the external component (Web Services) since the external component may not be automatically updating a resource within the Pipe-It project. In such cases Always Run Elements should be used.
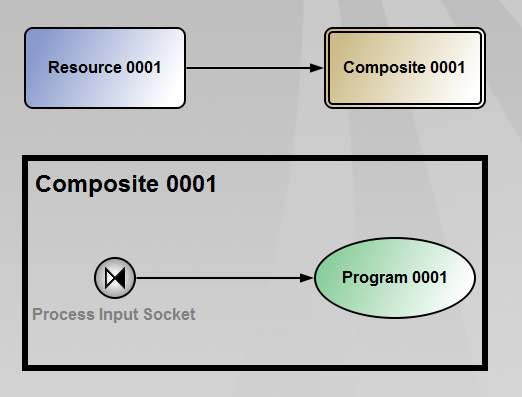
Process input sockets are used to connect a downstream Process to an upstream Resource located in a higher level of the project.
An example of a process input socket is shown below. The elements within the black border show the content of the Composite in the upper right corner.
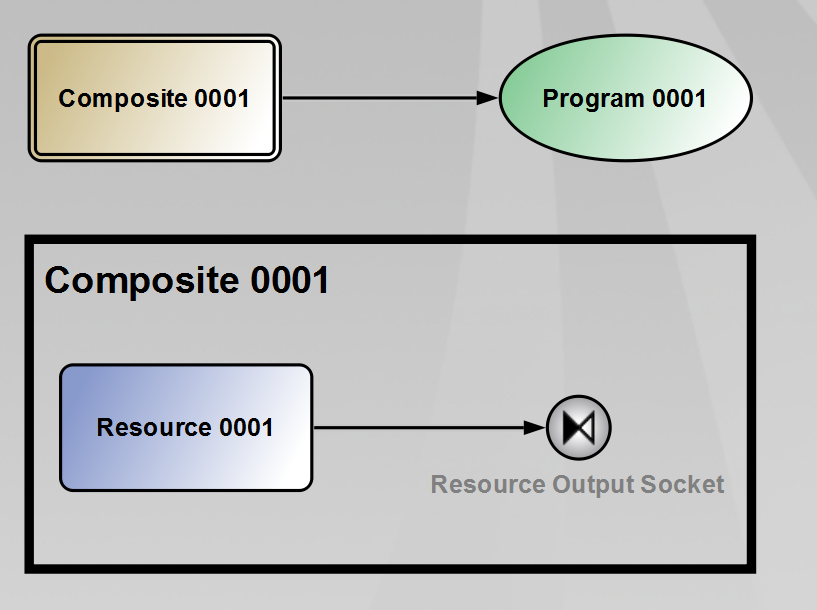
Resource output sockets are used to connect an upstream Resource to a downstream Process located in a higher level of the project.
An example of a resource output socket is shown below. The elements within the black border show the content of the Composite in the upper left corner.
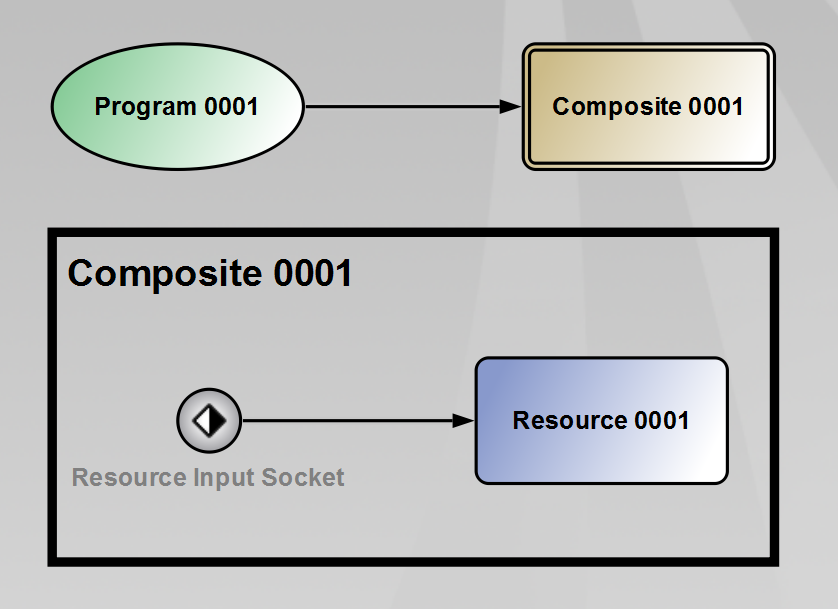
Resource input sockets are used to connect a downstream Resource to an upstream Process located in a higher level of the project.
An example of a resource input socket is shown below. The elements within the black border show the content of the Composite in the upper right corner.
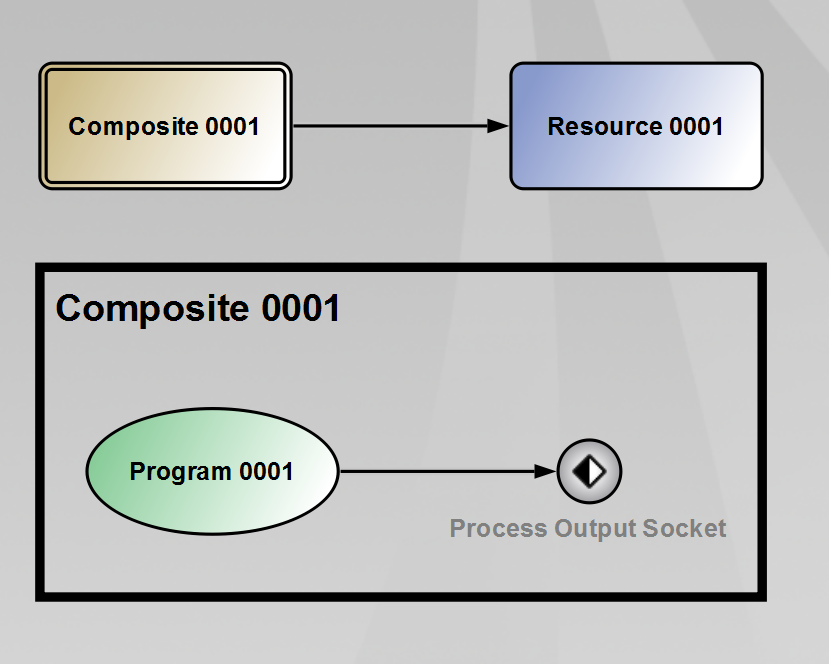
Process output sockets are used to connect an upstream Process to a downstream Resource located in a higher level of the project.
An example of a process output socket is shown below. The elements within the black border show the content of the Composite in the upper left corner.