How to use Pipe-It: A small working example
You can use Pipe-It to "pipe" together your project from bottom-up or top-down. Each software application being launched is called a Process.
Any file connected with a Process is called a Resource. You can chain together as many Processes as needed using Connectors, in any order (parallel and/or series). A collection of Processes can be grouped into a Composite. The total collection of all Processes, Resources, and Composites is a Pipe-It Project. An entire Pipe-It Project can be run time-and-again with changes to any input data using the Optimizer.The Runner orchestrates, without user intervention, intelligent and efficient launching of all Processes in a Pipe-It Project. And by using Linkz, any data in Resource files can be accessed and used for further operation.
In this page, you will find a step-by-step procedure to build a very simple Pipe-It project. This example will help you to start the interaction with Pipe-It.
A detailed description of a Pipe-It element can be examined by clicking the referenced item (a hyperlink).
Pipe-It Example: Launch a GAWK program
In this example, we will utilize Pipe-It to launch a gawk program (http://www.gnu.org/software/gawk/manual/gawk.html) that will extract data from a text file. Windows version of GAWK is installed with Pipe-It as part of Unix-Utils, to facilitate execution of Pipe-It projects across operating systems.
- Open the Pipe-It software. Go to the Start menu and choose the Pipe-It program.
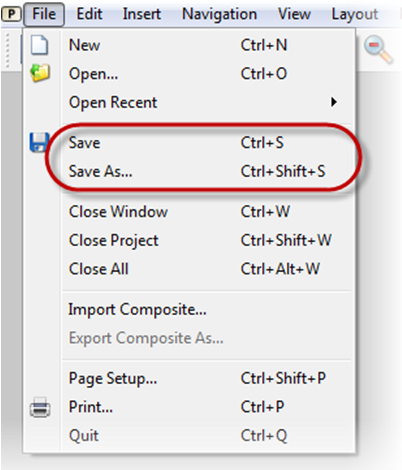
- Save the Pipe-It project in your preferred directory. Go to the File menu and choose "Save" or "Save As". You could also use the shortcut provided (Ctrl+S or Ctrl+Shift+S) to do this operation.
Note: A shortcut for an operation (if any) can be seen on the menu.
- You can start building the project by adding a title or a note in the Canvas to identify and/or give a general description of the Pipe-It project.
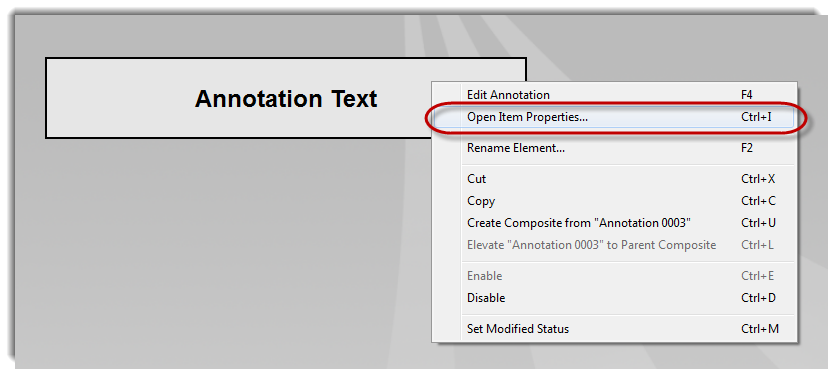
- Choose the text-box (Annotation) symbol in the Toolbar and place it at the preferred location on the Canvas. Double-click to edit the annotation text and press "OK" when finished. You could also edit the display (Color / Line / Font etc.) by placing the cursor on the text-box, right-click, and choose "Open Item Properties...".

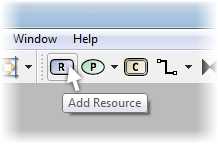
- Adding a Resource to the Pipe-It project. Choose the Resource symbol on the Toolbar, or just simply press "R", and place a Resource element on the Canvas.
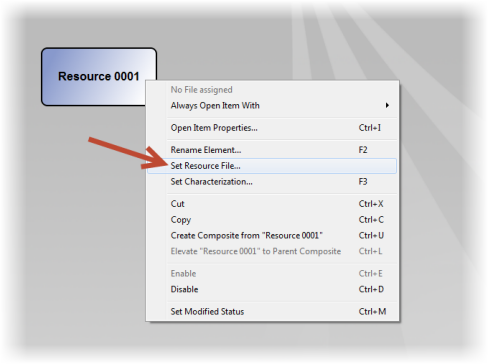
- Associate a data-file (employee.txt) with the Resource. Right click on the Resource box and choose "Set Resource File...". Find the data-file and click "Save". In this case you will create this file, so just give it the suggested, or another name.
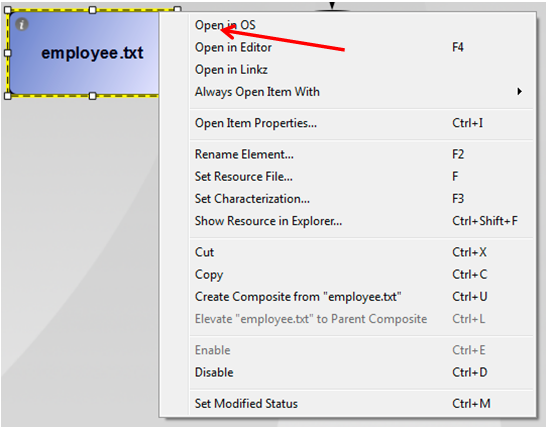
- Right-click this resource and choose to “Open in Editor” (or just press F4 after selecting the resource):
- Depending on your Pipe-It Preferences the empty file will open in Notepad or your preferred text Editor. Populate it with the following data and Save it.
00 Thomas Manager Sales $5,000
200 Jason Developer Technology $5,500
300 Sanjay Sysadmin Technology $7,000
400 Nisha Manager Marketing $9,500
500 Randy DBA Technology $6,000
- This data can be copied from the website which is the source of this example:
(http://www.thegeekstuff.com/2010/01/awk-introduction-tutorial-7-awk-print-examples/)
- Add one more Resources and associate it with the (actions.awk) using the same procedure as above and populate it with the following:
{print;}
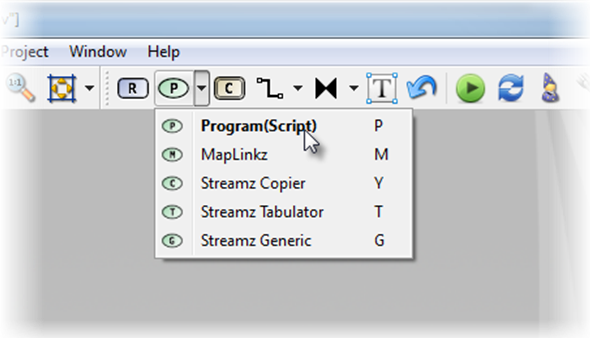
- Adding a Process to the Pipe-It project. Choose Process symbol on the Toolbar and choose "Program(Script)" or just simply press "P". Place the Process element on the Canvas.
- You can rename the Process element by right-clicking on it and selecting "Rename Element...", or just simply press F2 with the Process element on the Canvas selected.
- Connect all input resources to the process by using Connectors. Click the Connectors symbol on the Toolbar to activate it and then connect the preferred resource with the process element. First move the mouse to the (actions.awk) Resource, connection points (small white marks) should show up on the edge of the element. Left-click once at one of the points, then move to the Process element and left-click again at one of the connection points on that element (you can also just click and hold the left mouse button at the connection point on the Resource and then go to a connection point on the Process and release the button). Now the Resource and the Process should be connected by an arrow, going from the Resource to the Process. Do the same for the (employee.txt) Resource.
- The Pipe-It project should now look similar to this. A second annotation (text box) has been added to provide additional information.

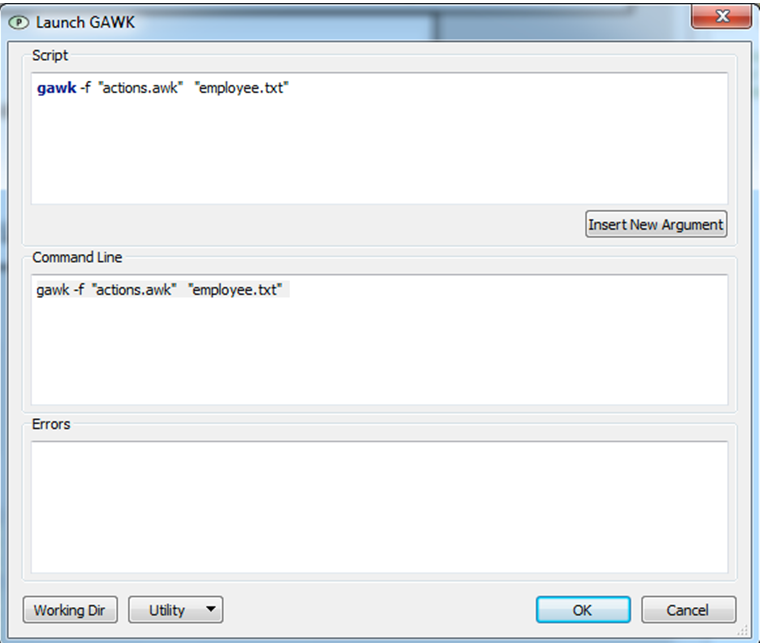
- To be able to launch the Gawk program, we need to write a script inside the Process element based on the Pipe-It usage of the AWK syntax.
- Double-click the process element and in the "Script" box type the command line to invoke Gawk application.
gawk
- The syntax of the awk command is actually:
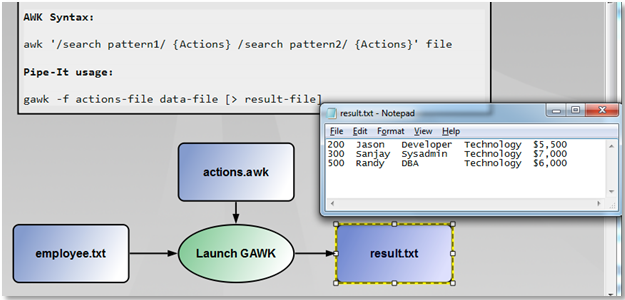
gawk -f actions-file data-file [> result-file]
- Thus, inside the "Script" box we need to use the syntax above and insert actions-file (.awk) first, then the input file and the output file.
- The command line inside the "Script" window should look like:
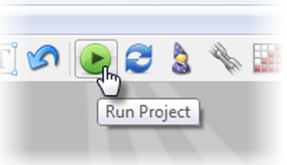
- Run the Pipe-It project by clicking the "Run Project" symbol on the Toolbar or by using the shortcut "Ctrl+R".
- A green check-mark symbol will appear on the elements if the project runs successfully. If an error occurs, you will see a red-flag symbol on the broken element.
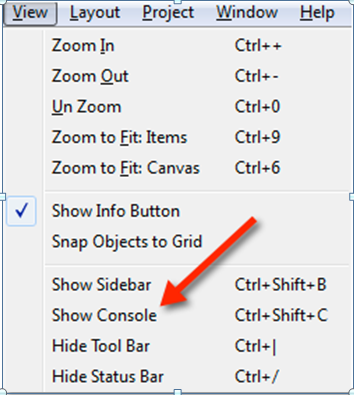
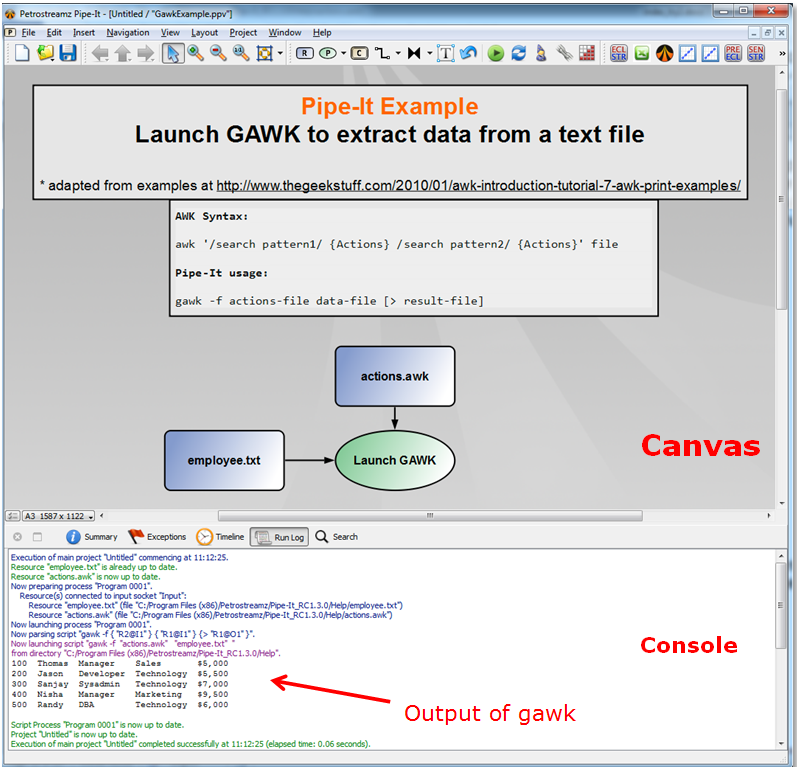
- Since the optional output file was not specified in this example, gawk sends the output of the program to the standard output. Pipe-It provides a console to capture this output from the program. To view this console click on the View menu item and select Show Console:
- A Console Window will open to show the result of the execution. In this example since the actions file contained only the action to print, each line will be printed on the console:
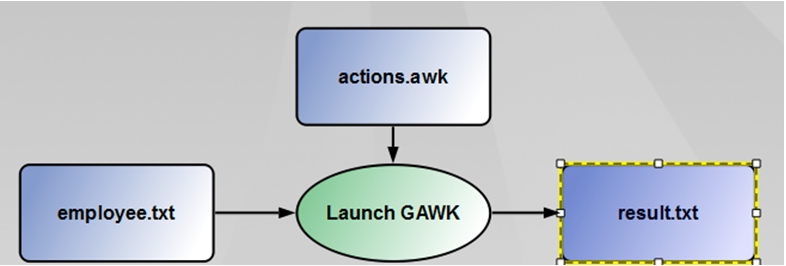
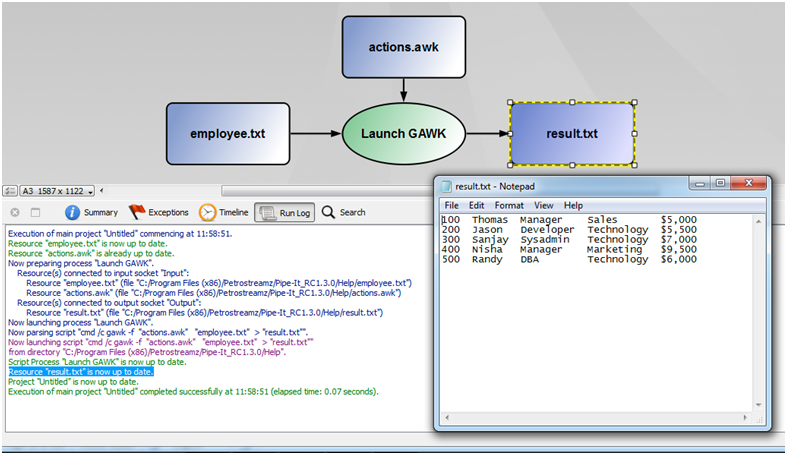
- The next step in this mini-tutorial is to save the result instead to a file. Create another Resource on the canvas and connect it as an Output to the Process (start the connector from the Process and drive it to the new Resource). Associate this resource to a file named result.txt:
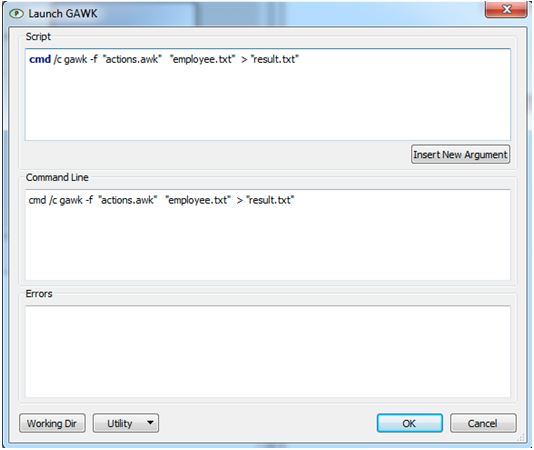
- Since the syntax of gawk requires “redirection” operator (>) to pass the output to a file instead of to the console, we need to modify the Script in the Program. To enable the “>” to be interpreted correctly by the operating system (Windows), the command line needs to be processed via the command shell. The final command needed looks like this:
- Run the project again. This time the Console only logs what was done but the result is sent to the file. In the picture below the result.txt file is opened in Notepad to show the content.
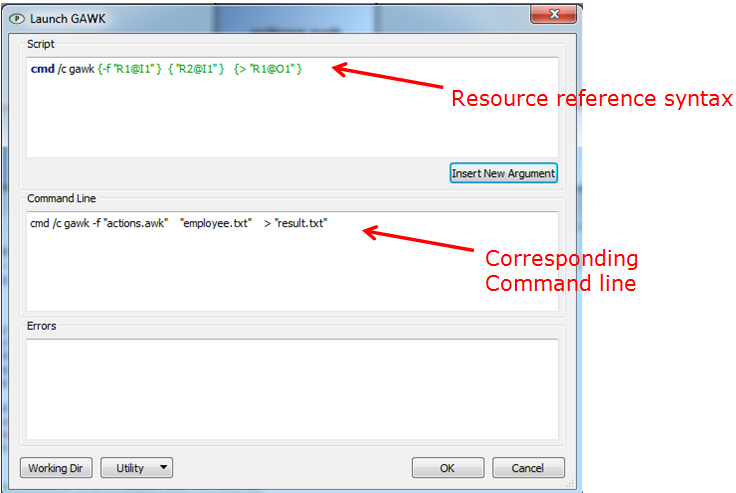
- Pipe-It offers many features to make your projects flexible, robust and sustainable. One such feature is the use of Resource References instead of directly coded file names (Covered in detail later in this manual). You might want to come back to this project when you have studied it. The screenshot below shows the content of the Process. Note that the Script uses Resource References syntax while the parsed command line is identical to what we saw earlier.
- Before we close this project, let us try to alter the action, which is very boring right now. Change the content of the action.awk file to (fourth column contains Technology):
$4 ~/Technology/ {print;}
- Pipe-It uses gawk to select only lines fulfilling certain criteria and write the results to a file. Save and close the Pipe-It project.
Congratulations! You have just created your first Pipe-It project and run it.
This Pipe-It project example is very simple and far from what Pipe-It can do in real application. This exercise comes with the intention to help new users to start the basic interaction with Pipe-It.
For some real Pipe-It project examples, please refer to Pipe-It Example Projects on the website.
Copyright © 2008-2013 Petrostreamz